Sewing tutorial to make a reversible library tote bag with lining and pocket fit for several books and has extra space for pens, phones, or snacks.
DIY Book Bag
This library tote bag has a boxed corner on the bottom, but you can skip the process to box it. It would be a similar process to this Easter bunny treat bag.
As an Amazon Associate I earn from qualifying purchases. This post may contain affiliate links. Please see the Disclosure Policy for details.
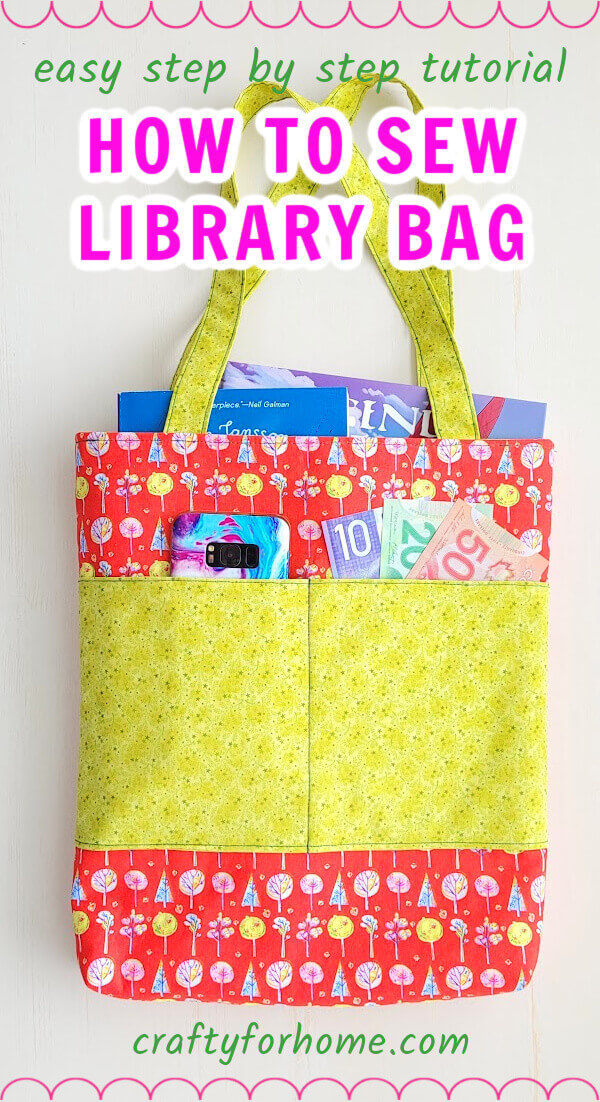
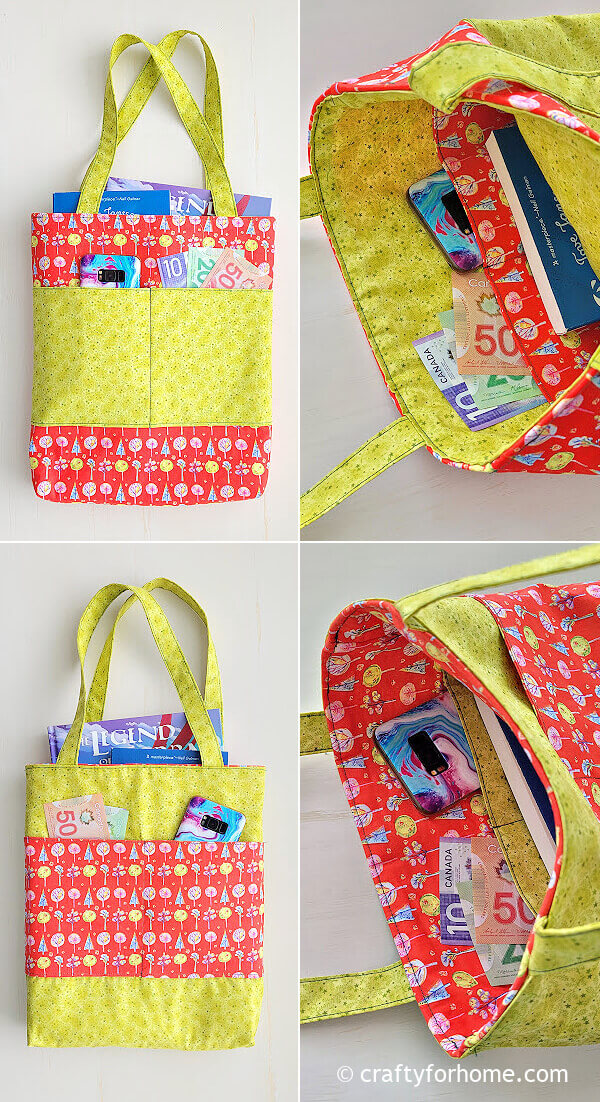
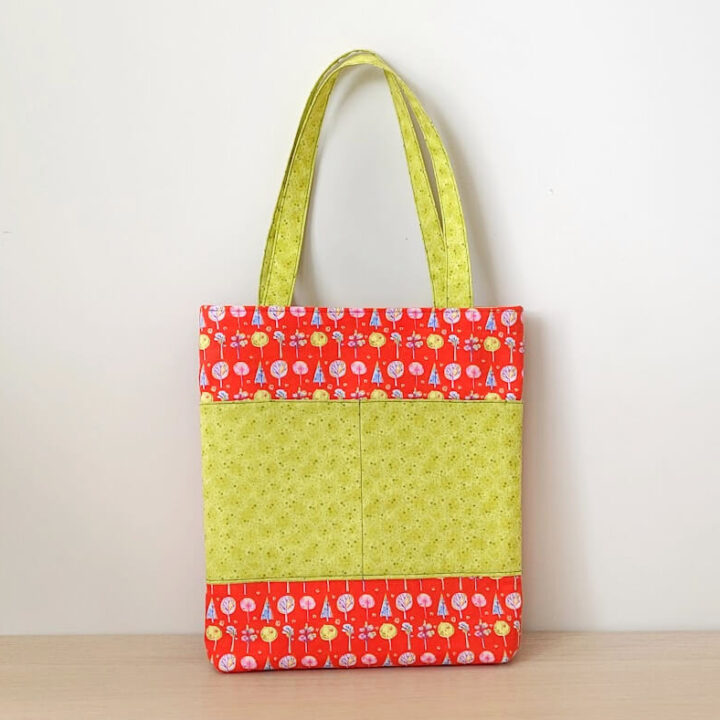
This DIY library bag fits three or four books, depending on the book’s thickness. The bag is reversible, with pockets on both sides.
Supply For Making A Library Tote Bag
If you use 1-yard fabric, the bag and the strap will have the same print and colour. If you use four pieces of different prints and colours of the fat-quarter fabric bundle, the outer layer, inner layer, and strap will have a mix-and-match print and colour.
Use quilt batting if the iron-on fusible interfacing is unavailable. Cotton or polyester batting works just fine for the project. The tutorial for the strap would be similar to this fabric strap.
- 4 pieces of fat-quarters or 1-yard fabric
- Iron-on fusible fleece or quilt batting
- Disappeared ink fabric marker, like this dual-purpose fabric marker
- Pins or quilting clips
- Thread
- Ruler
- Ironing machine
- Sewing machine
Library Tote Bag Tutorial
The video tutorial is also available. You can watch the Reversible Library Tote Bag With Pocket video tutorial published on my YouTube channel and subscribe for more videos.

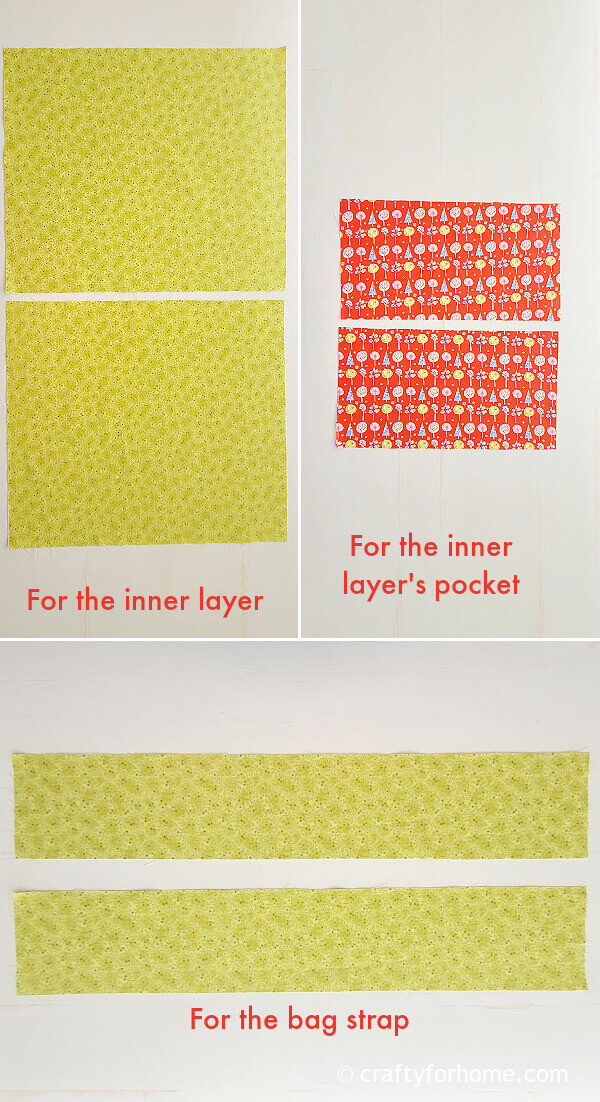
Prepare the material into these measurements:
- Fabric into four pieces of 13″ x 15″ for the outer and inner layers.
- Fabric into two pieces of 4″ x 22″ or longer from any print you use for the strap.
- Fabric into four pieces of 7″ x 13″ for the pocket.
- Iron-on fusible fleece into two pieces of 13″ x 15″.
For the strap, lay flat the fabric with the wrong side facing up. Fold the rectangle fabric in half lengthwise, then open it up again.
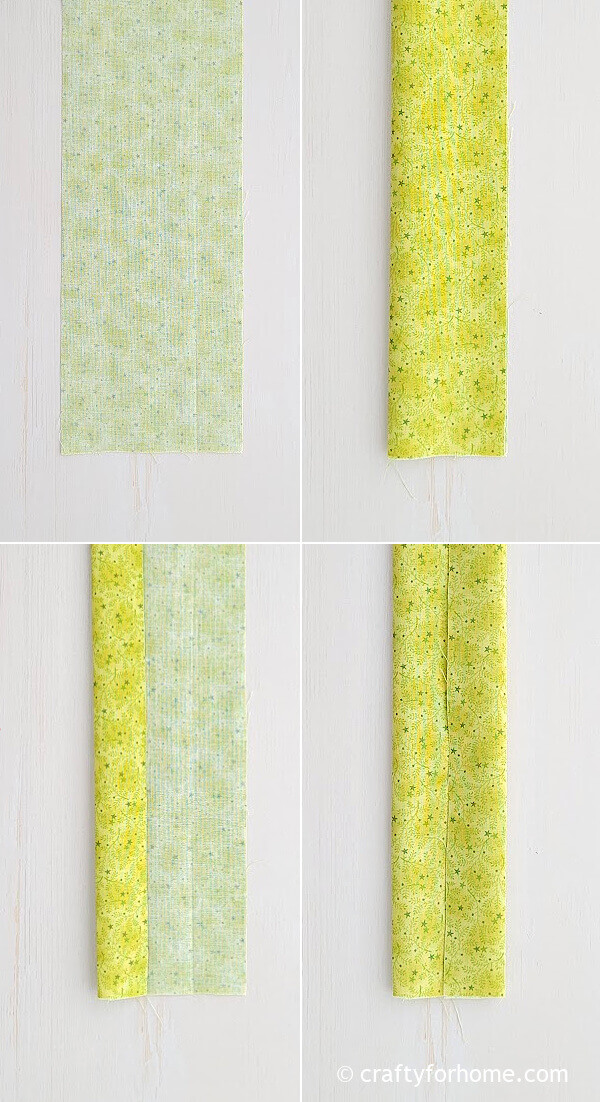
Fold both raw edges inward so the wrong side of the fabric is inside now. Fold it again so both edges are aligned. Press the fabric for the strap with the ironing machine.
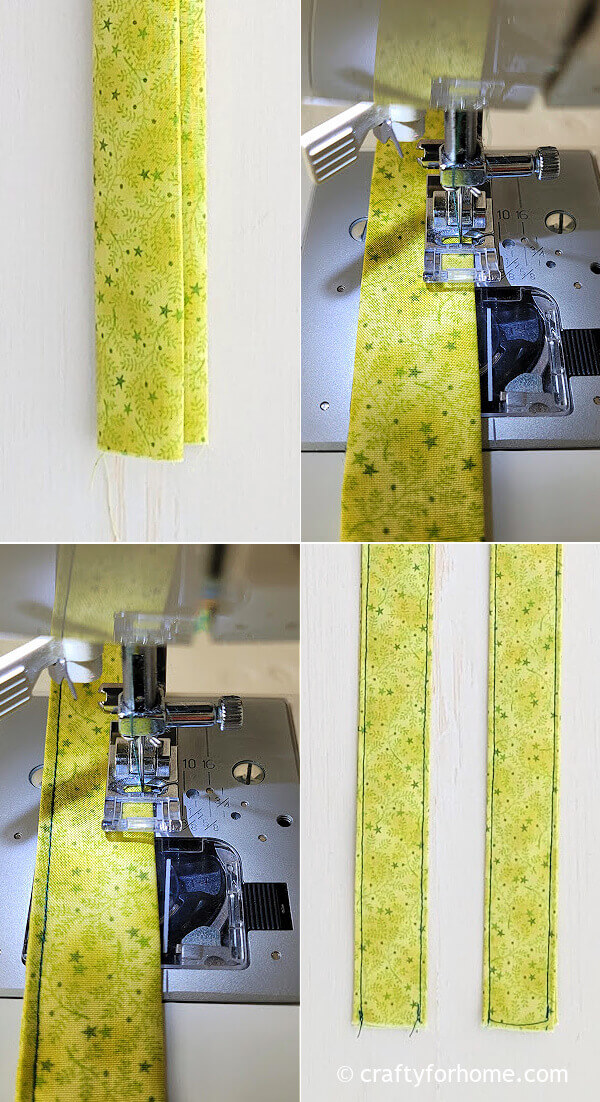
Topstitch along the edge on both sides. Sew the other piece of fabric for the strap
Fuse the iron-on fusible fleece with the ironing machine on the wrong side of both fabrics for the outer layers.
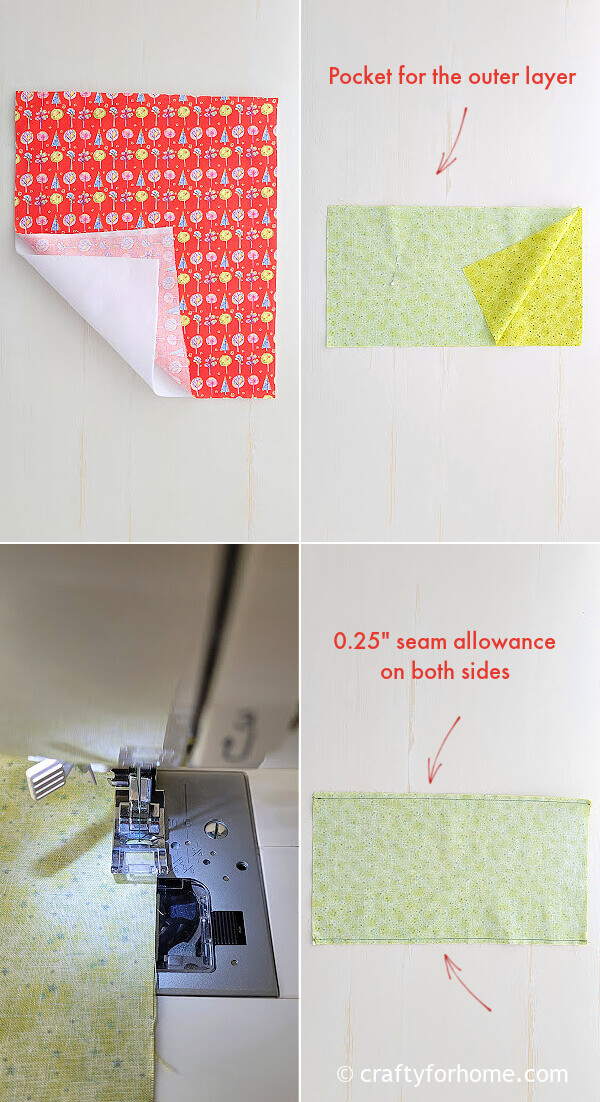
For the pocket, pin both fabrics with the right side facing each other.
Sew on both sides of the 13″ with 0.25″ seam allowance.
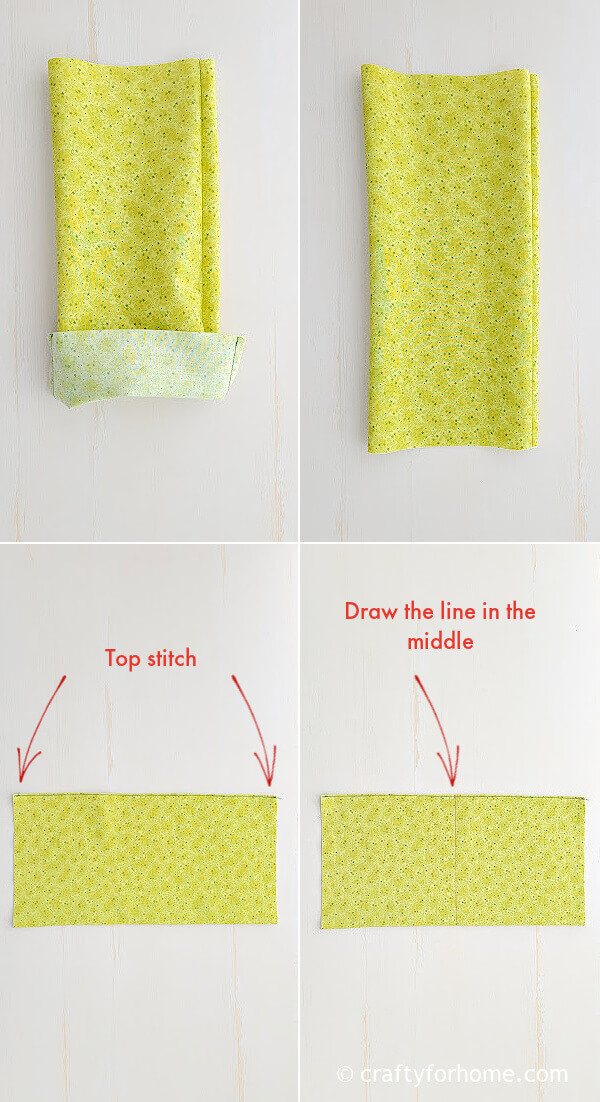
Turn the fabric right side out. Press it with the ironing machine. Topstitch on one stitched side. Fold the pocket layer in half, mark the line in the middle of the pocket.
Pin or use quilting clips the fabric for the pocket to one of the outer layers 4″ down from one of the short edges.
Topstitch the marked line in the middle of the pocket, then topstitch the bottom edge.
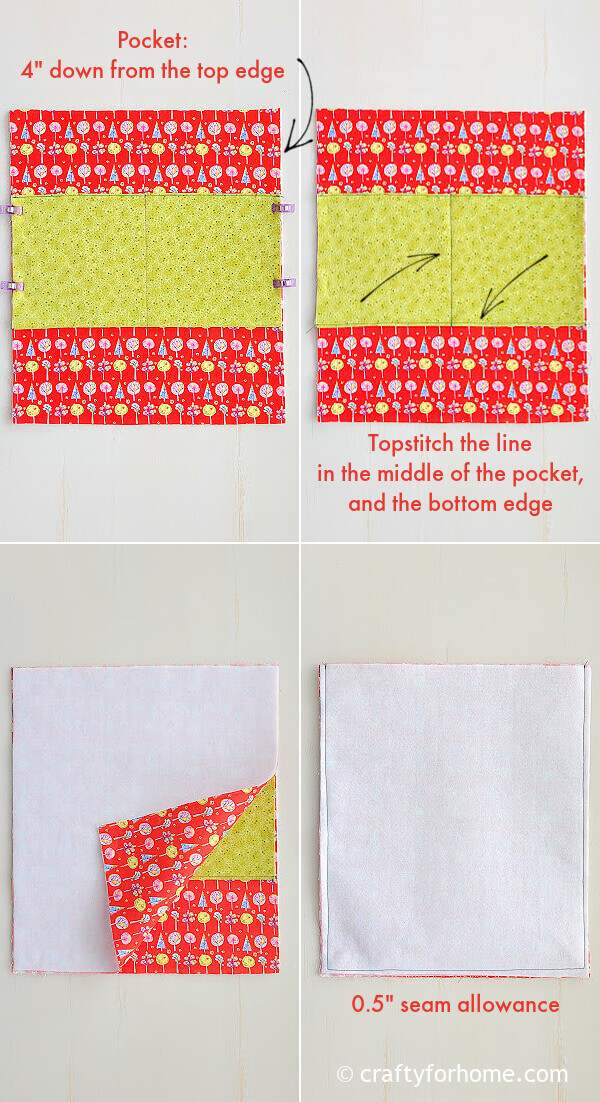
For the outer layer, pin together both fabrics for the outer layers, with the right side facing each other.
Sew along the edge with a 0.5″ seam allowance.
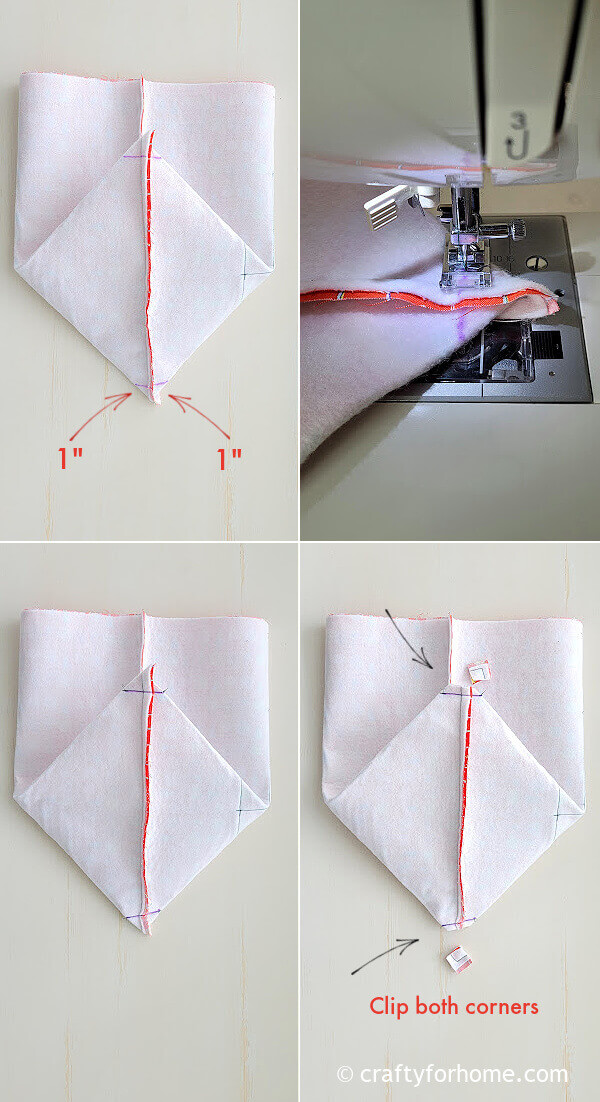
Box the bottom of the bag by aligning the bottom and the side stitch, then measure and mark it 1″ left and right from the corner. Draw the line to connect the marked spots.
Sew along the line on the boxed corners. Clip the extra fabric on the boxed corners.
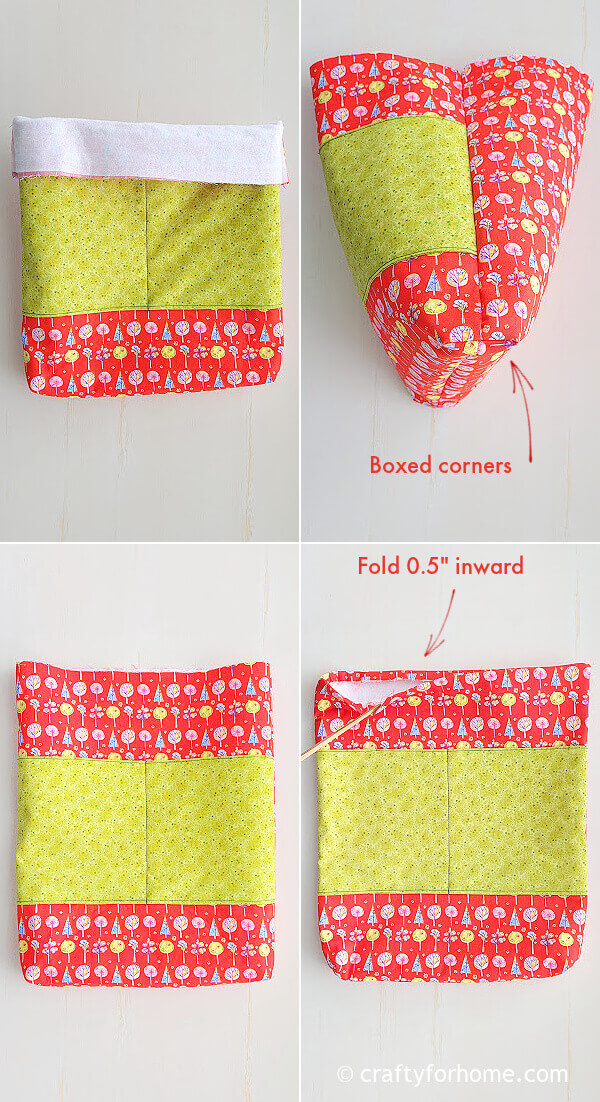
Turn the outer layer of the bag right side out. Fold the top of the outer layer bag 0.5″ inward and press it with the ironing machine.
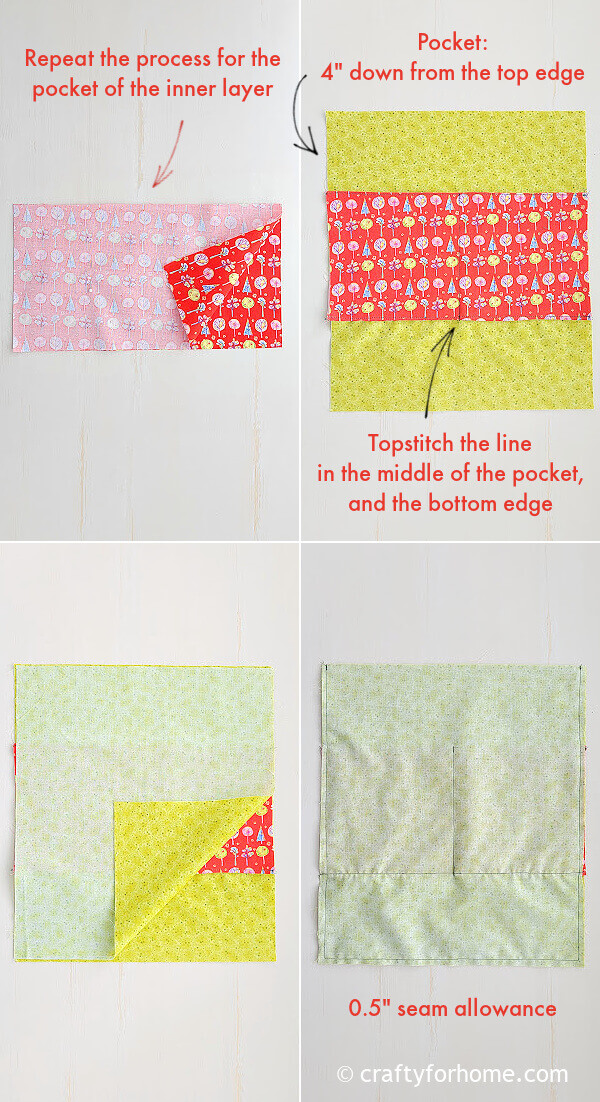
For the inner layer, repeat the process for the pocket of the inner layer bag. Repeat the process for the inner layer without adding the fusible fleece.
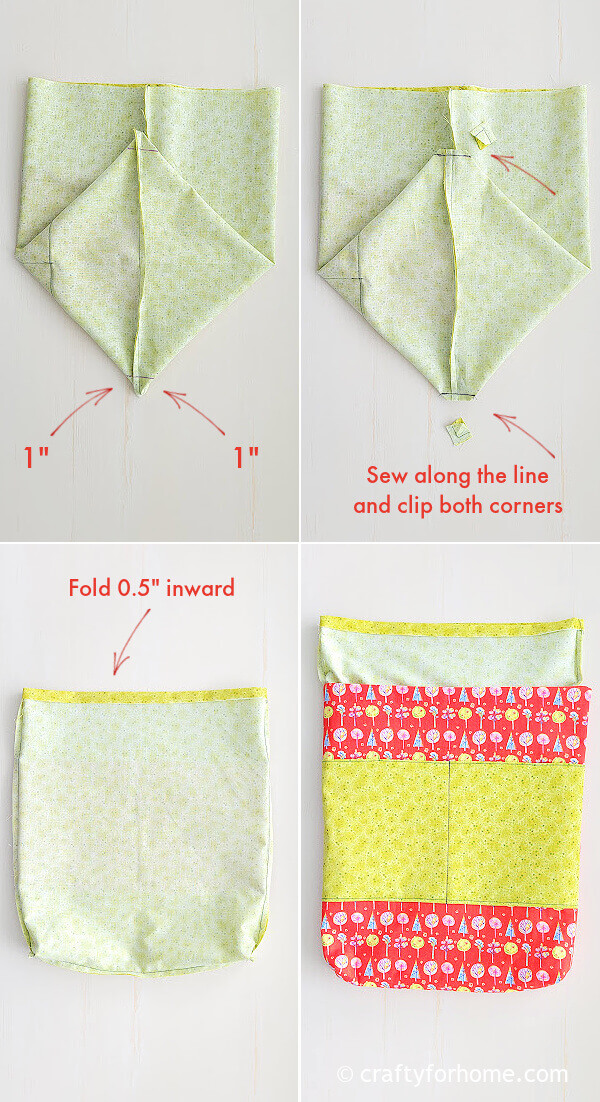
Fold the top of the inner layer bag 0.5″ inward and press it with the ironing machine.
To put the library tote bag together, insert the inner layer bag into the outer layer and the wrong side of both fabrics facing each other.
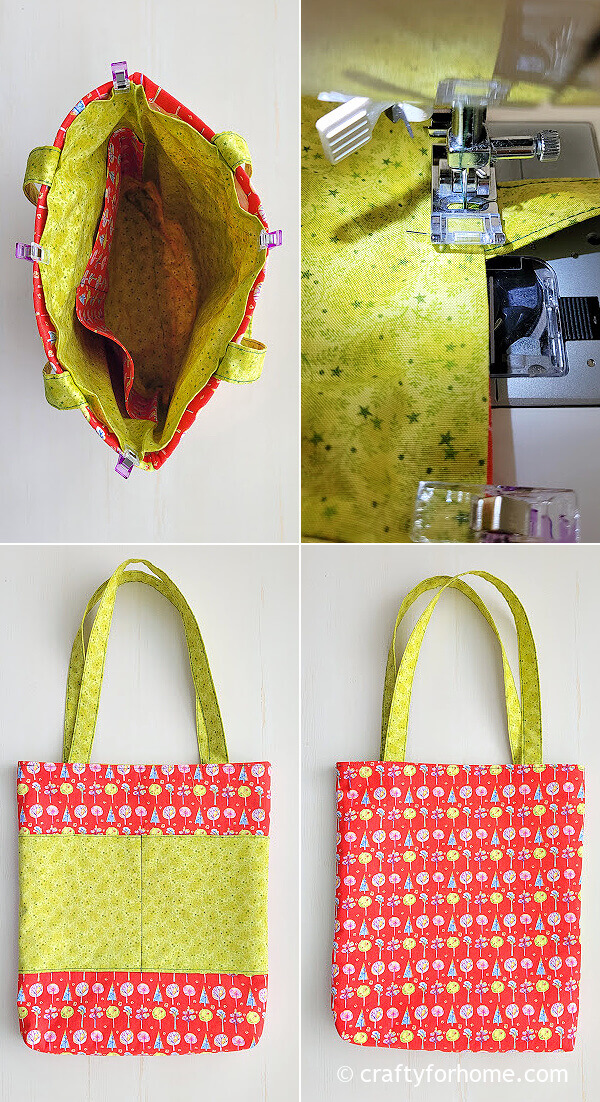
Align the top edge of both fabric layers. Insert both fabric straps with 0.5″ of both ends inside the folded hem, then pin it.
Topstitch along the top hem of the bag. The bag is ready to use now.
Since the final size of the bag was around 12″ x 13″, this DIY library bag is the perfect size for kids. Of course, if you want to make a larger bag, then change the measurement for the material as you need.
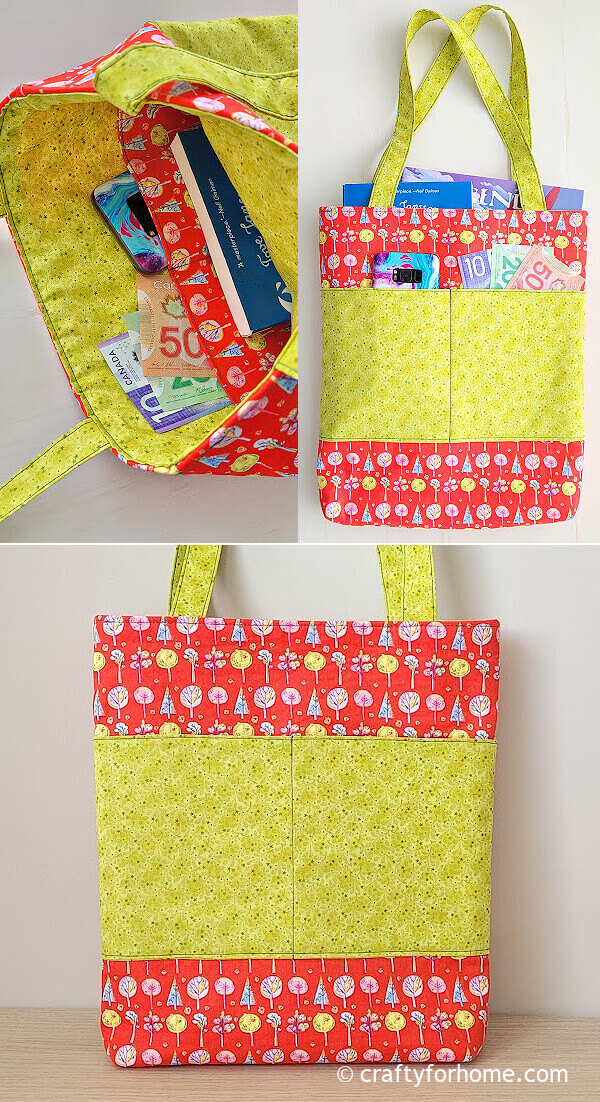
This tote bag is reversible and has pockets on both sides. Each pocket has two compartments, which will fit for cards, cash, a cell phone, or snacks.

Helpful tips: use iron on fusible fleece on both inner and outer layers to make both sides of the bag sturdy if you use a thin cotton fabric.
As you can see, the green fabric I use is a bit thinner than the red one, and I didn’t use the fusible fleece on it, so it didn’t look sturdier like the red fabric layer, but the bag is still functional just fine, and I make someone happy with this new book bag.
Get The PDF
If it is more convenient to have the printable version of this tutorial for the project, you can purchase the Printable PDF Format of Reversible Library Tote Bag With Pocket Sewing Tutorial here. The e-book has the template and complete tutorials with pictures included. There are no ads or video displays on the PDF so that you can print it, and it will be available for you anytime you need the tutorial for your next project. Click on the e-book cover image above to purchase.
Easy tutorial for making a DIY book bag with lining and pocket for the library trip. #librarybag #easytotebag Share on XMore Sewing Tutorials For Making Bags
- Reversible Beach Bag
- Wine Bottle Tote Bag
- Cell Phone Crossbody Bag
- Mermaid Tail Coin Bag
- Laptop Sleeve Tutorial
DIY Library Tote Bag With Pocket
Easy Library Tote Bag Tutorial With Lining And Pocket
Sewing tutorial to make a reversible library tote bag with lining and pocket fit for several books and has extra space for pens, phones, or snacks.
Materials
- 4 pieces of fabric 13" x 15" each for the outer and inner layers.
- 2 pieces of fabric 4" x 22" each or longer from any print you use for the strap.
- 4 pieces of fabric 7" x 13" each for the pocket.
- 2 pieces ofiron-on fusible fleece 13" x 15" each.
Tools
- Disappeared ink fabric marker
- Pins or quilting clips
- Thread
- Ruler
- Ironing machine
- Sewing machine
Instructions
- Fuse the iron-on fusible fleece with the ironing machine on the wrong side of both fabrics for the outer layers.
- For the strap, lay flat the fabric with the wrong side facing up.
- Fold the rectangle fabric in half lengthwise, then open it up again. Fold both raw edges inward so the wrong side of the fabric is inside now.
- Fold it again so both edges are aligned. Press the fabric for the strap with the ironing machine.
- Topstitch along the edge on both sides. Sew the other piece of fabric for the strap.
- For the pocket, pin both fabrics with the right side facing each other. Sew on both sides of the 13" with 0.25" seam allowance.
- Turn the fabric right side out. Press it with the ironing machine. Topstitch on one stitched side.
- Fold the pocket layer in half, mark the line in the middle of the pocket. Repeat the process for the other pocket piece.
- Pin or use quilting clips the fabric for the pocket to one of the outer and inner layers and 4" down from one of the short edges. Topstitch the marked line in the middle and bottom edge of the pocket.
- Pin together both fabrics for the outer layers and both fabric for the inner layer with the right side facing each other. Sew along the edge with a 0.5" seam allowance.
- Box the bottom of the bag by aligning the bottom and the side stitch, then measure and mark it 1" left and right from the corner. Draw the line to connect the marked spots.
- Sew along the line on the boxed corners. Clip the extra fabric on the boxed corners. Turn the outer layer of the bag right side out.
- Fold the top of the outer layer and inner layer bag 0.5" inward and press it with the ironing machine.
- To put the library tote bag together, insert the inner layer bag into the outer layer and the wrong side of both fabrics facing each other.
- Align the top edge of both fabric layers. Insert both fabric straps with 0.5" of both ends inside the folded hem, then pin it.
- Topstitch along the top hem of the bag. The bag is ready to use now.
Notes
Use iron on fusible fleece on both inner and outer layers to make both sides of the bag sturdy if you use a thin cotton fabric.


Leave a Reply