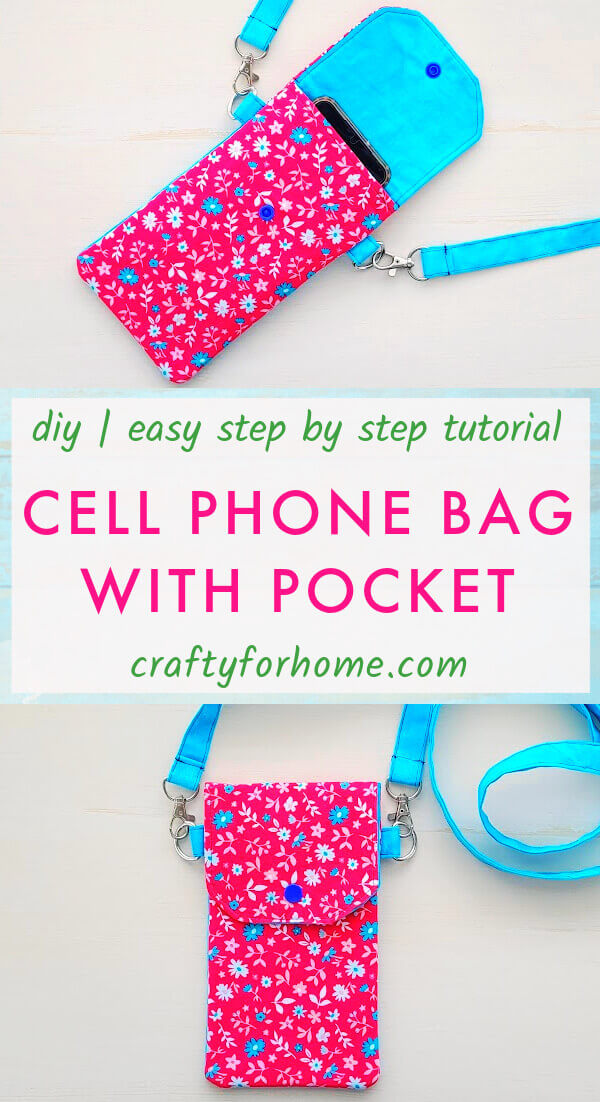
This sewing tutorial is for making a phone pouch out of fabric as a mini crossbody cell phone bag with a flap, a pocket, and a removable strap.
Mini Crossbody Phone Bag
Sometimes you want to bring only necessary things when visiting a specific event like a carnival or live concert. This little phone pouch is a simple bag with enough room for the phone and some cash.
As an Amazon Associate I earn from qualifying purchases. This post may contain affiliate links. Please see the Disclosure Policy for details.
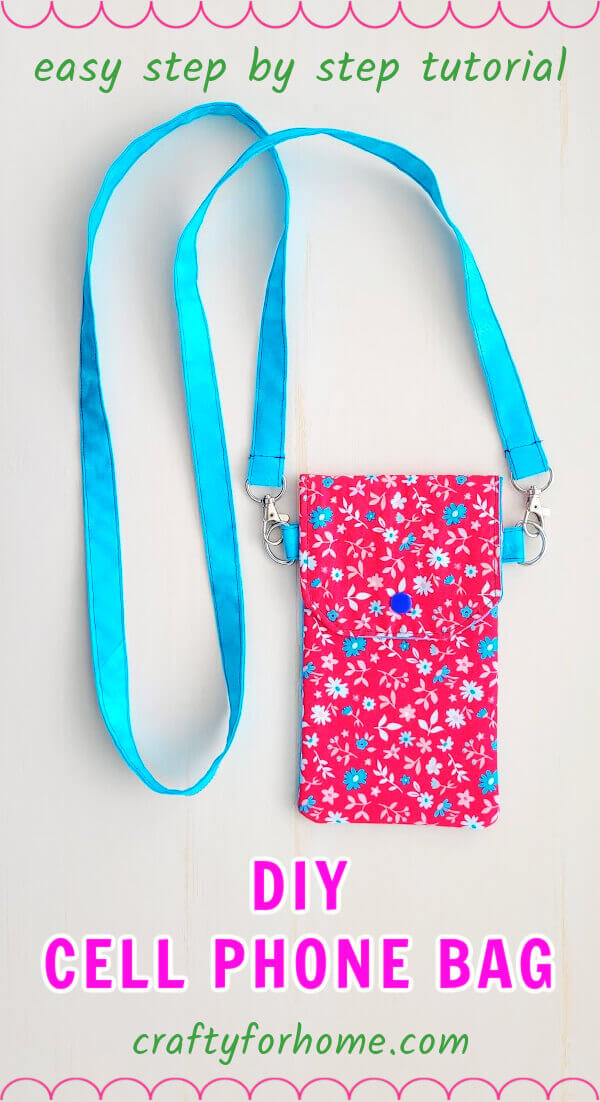
The tutorial to make this phone purse is similar to the laptop sleeve. It has a flap but uses snap buttons instead of a hook-and-loop fastener.
Supply To Make Cell Phone Bag
Using snap buttons is an easy way for the fastener if you want to avoid sewing a zipper.
This tutorial uses two cotton fabric prints to contrast the inner and outer layers. You can use one sheet of fat quarter fabric for the same look on the inner and outer layers.
Use the fabric for the straps or simplify it using a double-fold wide bias tape or specific material for a bag strap.
If you have some fabric strips from scraps or the jelly roll fabric bundle, use them to make the bag strap. Then make a shorter strap to turn the bag into a wristlet by using this ruffled wristlet tutorial.
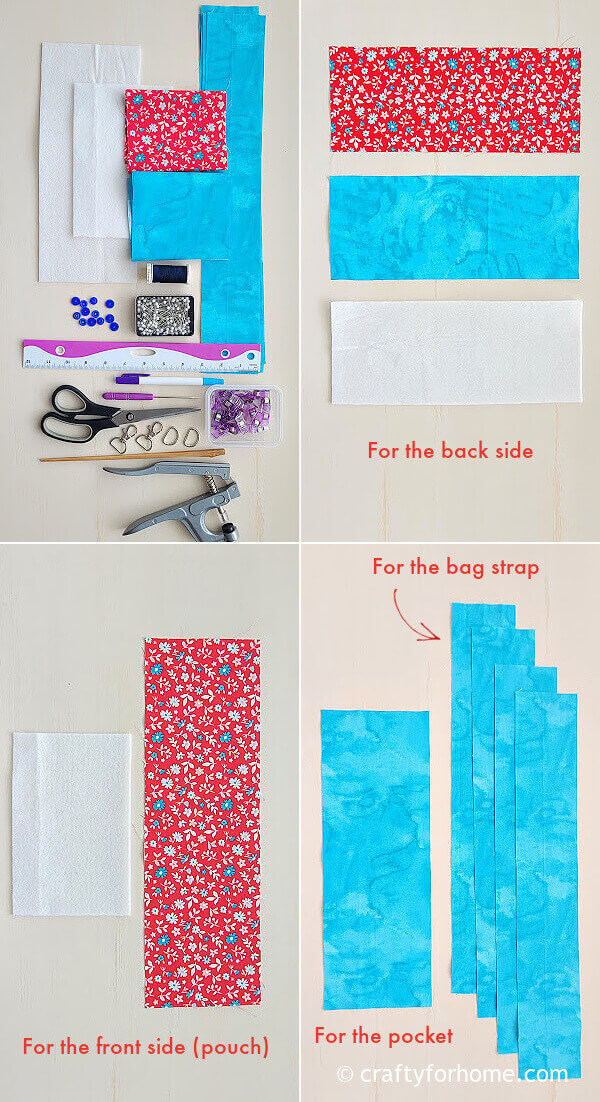
- 2 pieces of fat quarter cotton fabric
- Iron-on fusible fleece or quilt batting
- 2 pieces of 3/4″ Swivel lobster clasp
- 2 pieces of metal D ring
- Snap buttons and plier kit
- Extra fabric for the bag strap (from the leftover fabric of this project or use jelly roll fabric bundle) or double-fold wide bias tape
- Disappeared ink fabric marker, I always use the dual-purpose fabric marker.
- Quilting clips or pins
- Chopstick
- Thread
- Scissors
- Ruler
- Sewing machine
- Ironing machine
Cell Phone Bag Tutorial
The video tutorial is also available. You can watch the Cell Phone Bag video tutorial published on my YouTube channel and subscribe for more videos.
For the back side:
- Cut the fabric for the back side with the flap into 2 sheets of 5″ x 12″ rectangles (one sheet for the inner and one for the outer layer).
- Cut the fusible fleece or quilt batting into 1 piece of 5″ x 12″ rectangle.
- Cut the fabric for the pocket 1 sheet of 5″ x 14″
For the front side:
- Cut the fabric for the front side or the pouch into 1 sheet of 5″ x 16″ rectangles.
- Cut the fusible fleece or quilt batting into 1 sheet of 5″ x 7.75″ rectangle.
For the bag strap:
- Fabric for strap 3″ x 52″ or cut the bias tape for the strap into 52″ long.
Note: no need to press the iron-on fusible fleece now. You can iron it after turning the pouch right side out.
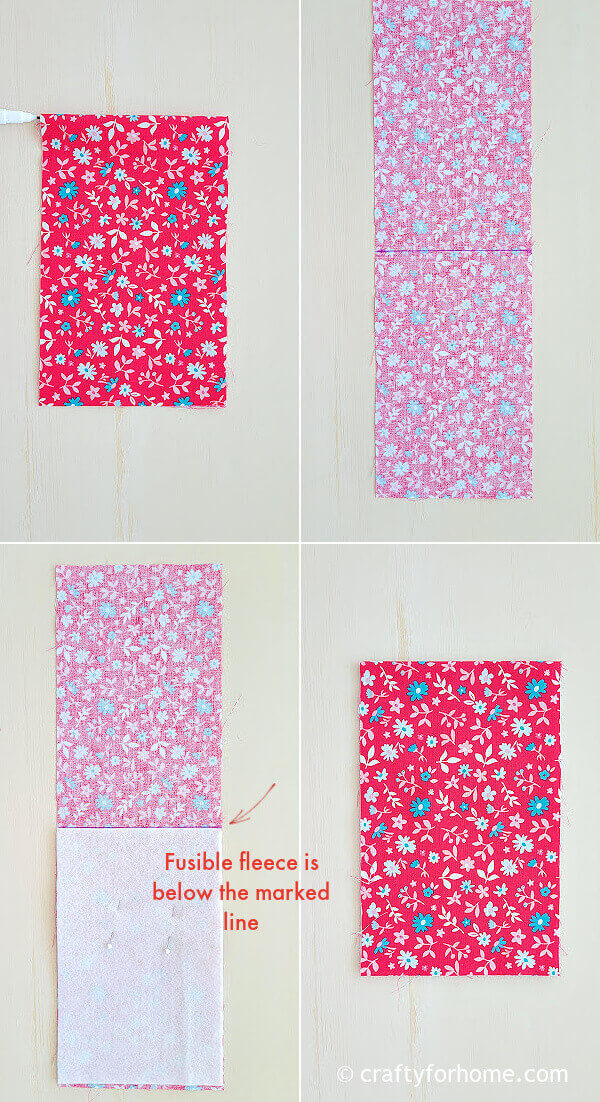
For the pouch or front side, fold the fabric in half with the wrong side of it inside facing each other, mark the folding spot and draw the line.
Put the batting or iron on fusible fleece on the wrong side of the fabric just below the marked line.
Pin it or use quilting clips. Topstitch the folded side with 0.25″ seam allowance.
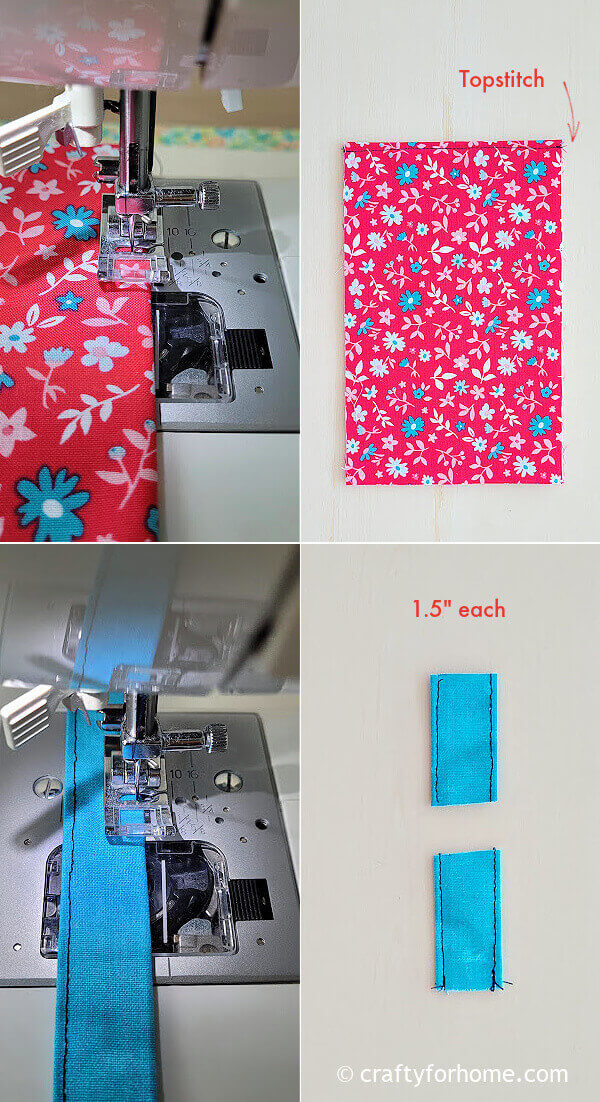
For the bag strap, if using the fabric, fold the long rectangle fabric in half with the wrong side of the fabric inside, and press it with an ironing machine. Then fold both long sides 0.5″ inward and press it with an ironing machine.
If using the double-sided bias tape, then topstitch the bias tape on both sides.
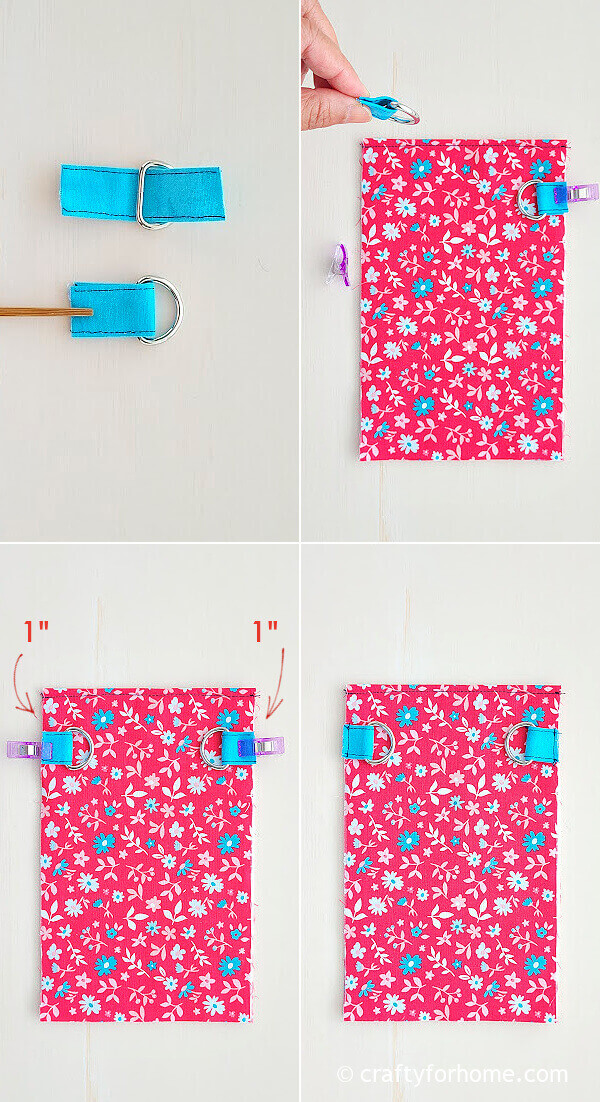
Cut the strap into 2 pieces of 1.5″ each. Attach the D rings on both tabs. Pin it for the tab on each side of the pouch 1″ down from the top corners of folded fabric.
Sew the tabs close to the raw edge to keep them in place so you can remove the pin or quilting clips.
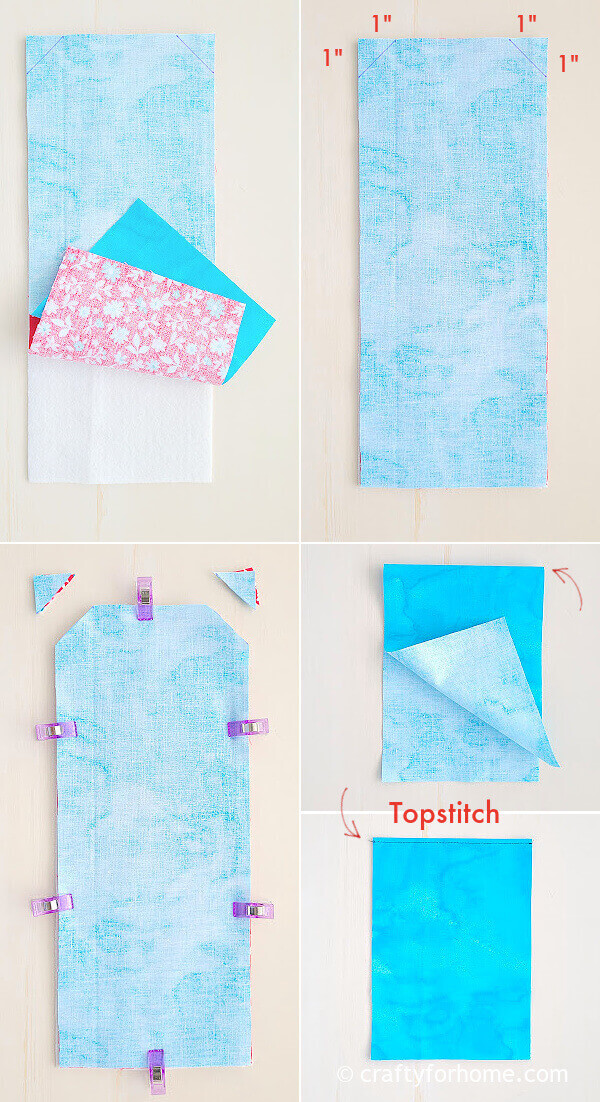
For the flap or back side, put the batting, outer and inner layers, with the right side facing each other.
Measure 1″ left, right, and down from the two corners on one of the shorter sides. Draw the line between the 1″ mark. Then trim it on both corners along the marked lines.
For the pocket, fold the fabric in half with the wrong side of the fabric inside facing each other. Topstitch on the folded line.
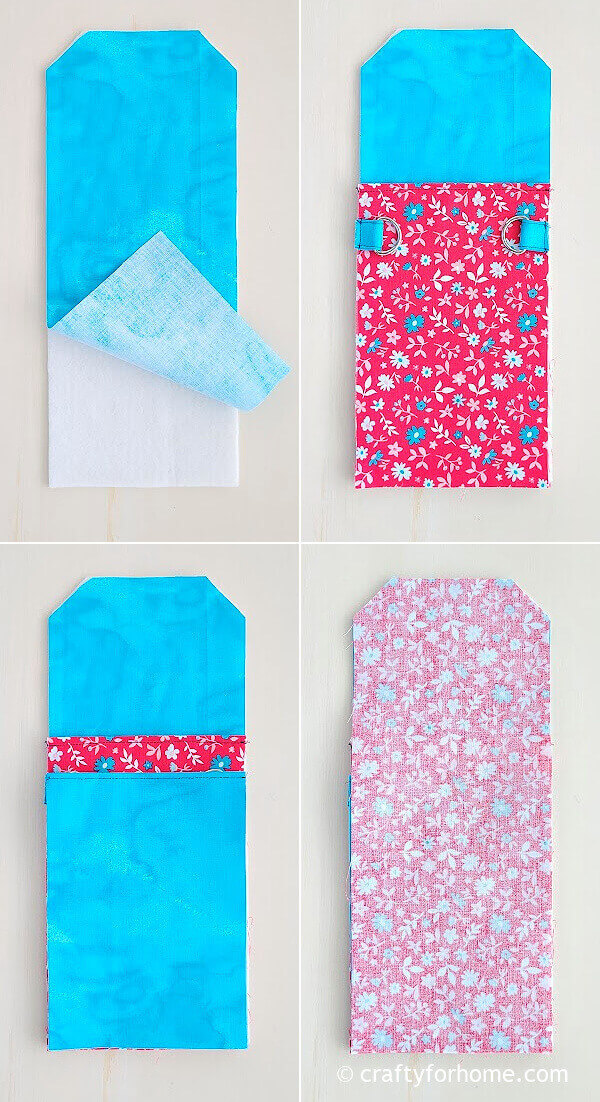
To sew the cell phone bag together, sandwich all material in this order, batting for the flap, inner layer for the flap with the wrong side facing down, pouch side, pocket, and outer layer for the flap with the wrong side facing up.
Make sure the tab is inside the fabric layers.
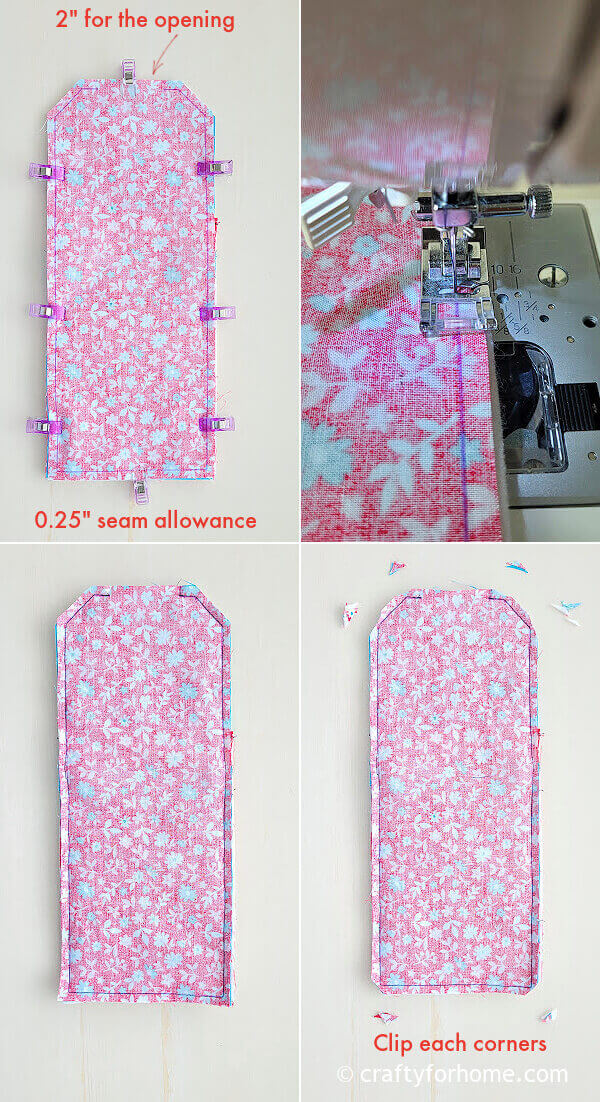
Sew straight along the edge with 0.25″ seam allowance, and skip 2″ on the flap for the opening.
Clip the extra material on each corner to reduce bulk.
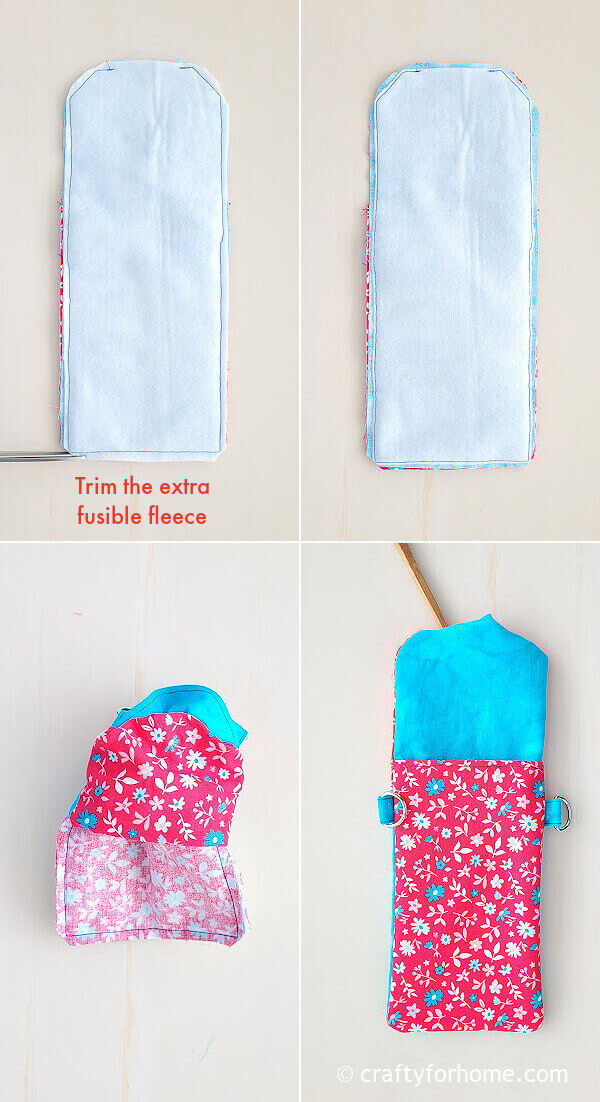
Trim the extra fusible fleece or batting close to the seam allowance stitch.
Turn the bag right side out through the opening. Use the chopstick to push each corner. The pocket would be on the backside.
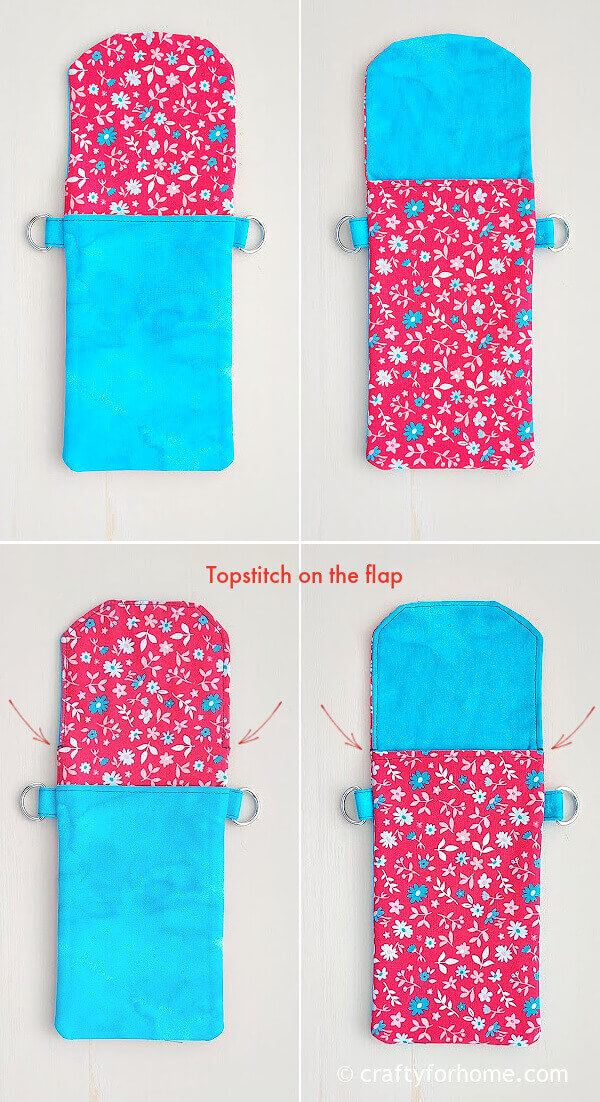
Press the bag with the ironing machine, topstitch along the flap and sew the opening close at the same time.
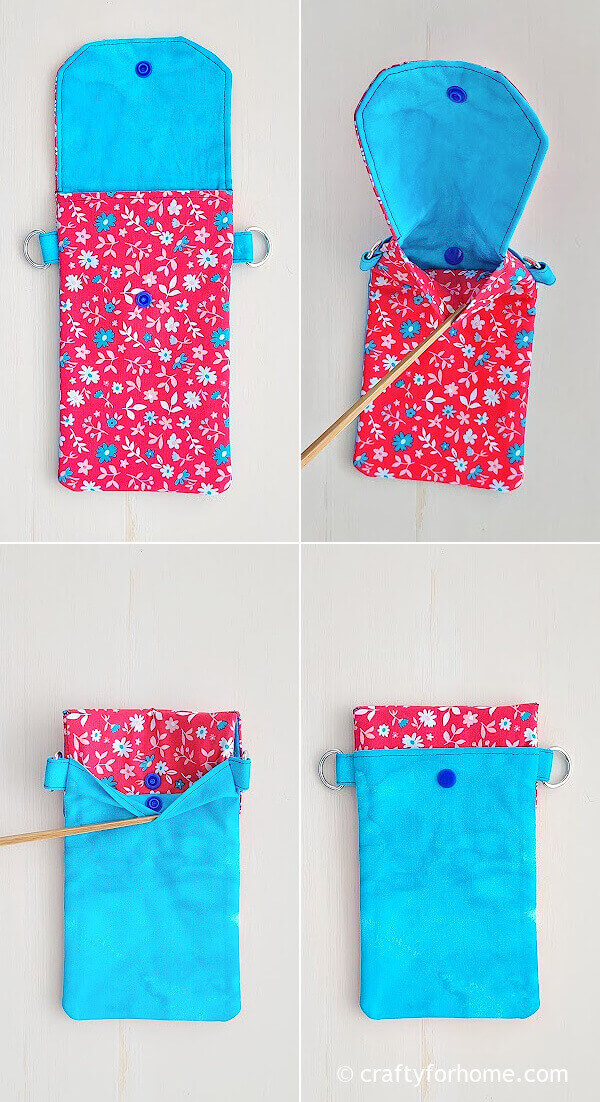
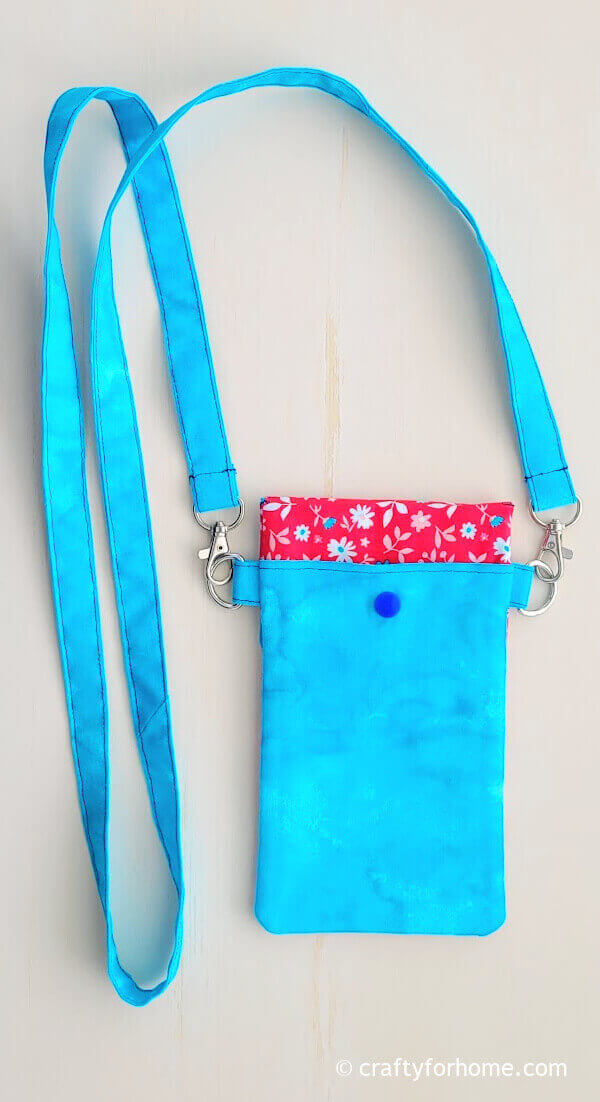
Attach the snap button on the pouch and the flap. Attach another pair of snap buttons on the back and pocket of the bag.
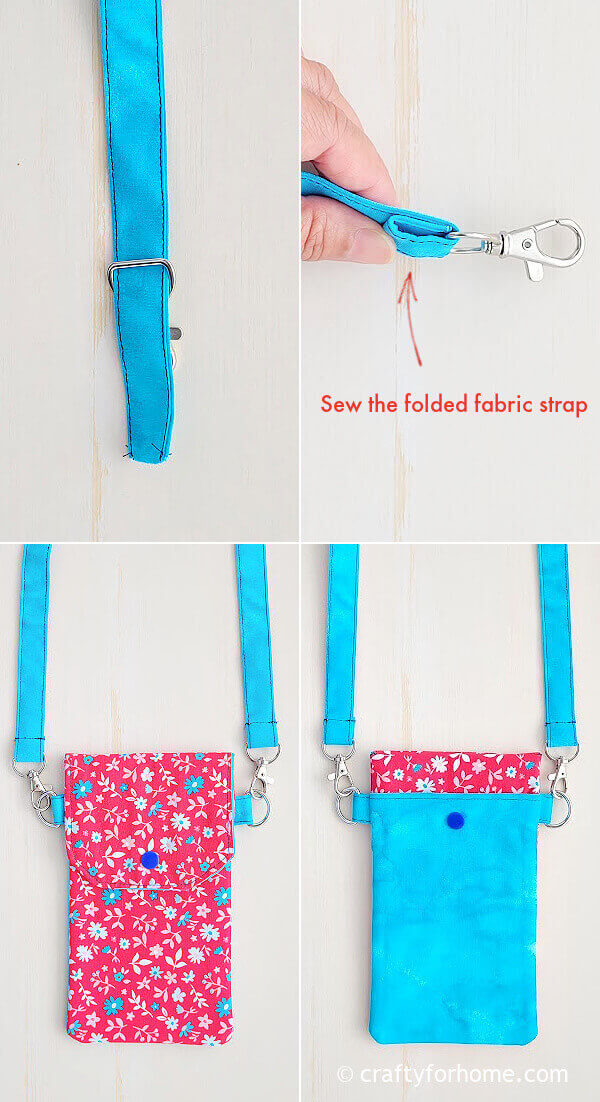
Loop one end of the bag strap to the swivel lobster clasp, fold it once, then sew it along the fold. Repeat the process to attach the other swivel lobster clasp.
Attach the swivel lobster clasp to the D ring.
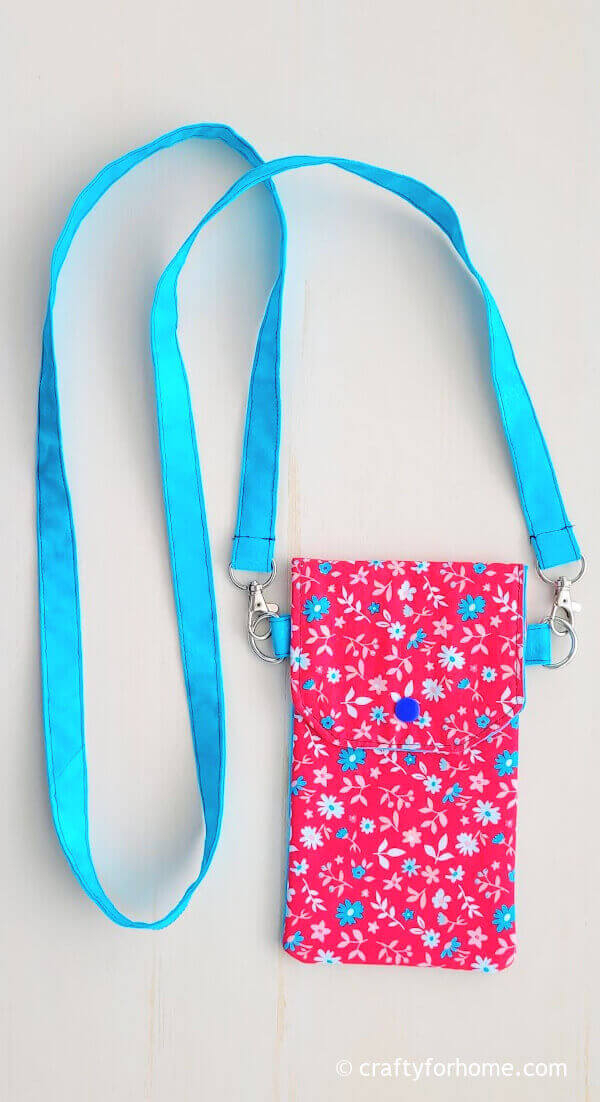
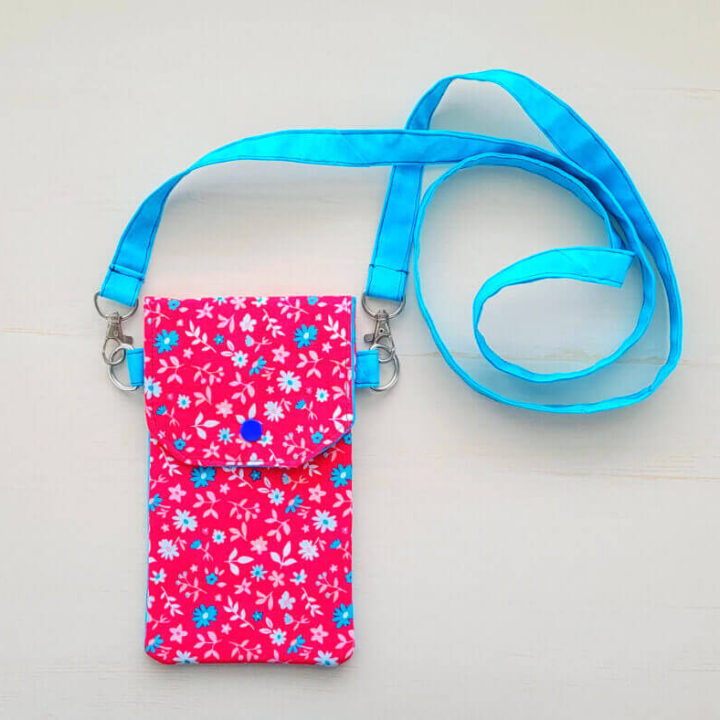
The DIY phone purse is ready to use now. The final size of this cell phone bag is around 4.5″ x 7.75″.
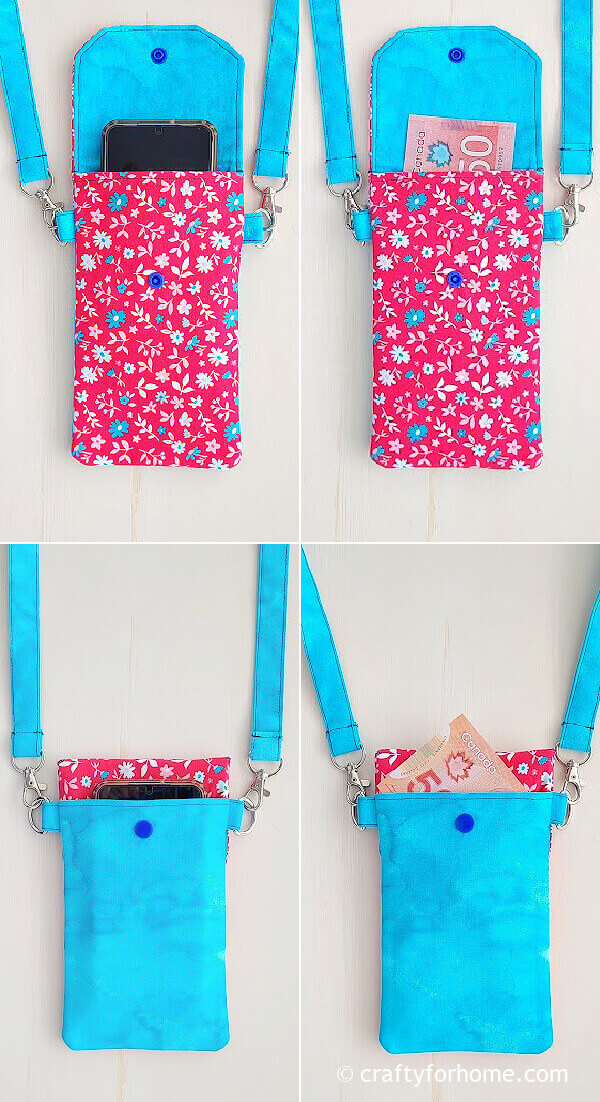
The bag is large enough to fit an iPhone or Android phone. My phone is Samsung S20, and it is pretty large. It fits perfectly inside the bag.
The pocket in the back is also fit for the cell phone, also perfect for storing some cards or cash.
Cut the strap into 12″ long before looping the swivel lobster clasps to turn the crossbody phone bag into a wristlet cell phone bag.
Get The PDF
If it is more convenient to have the printable version of this tutorial for the project, you can purchase the Printable PDF Format of Cell Phone Crossbody Bag Template And Sewing Instruction here. The e-book has the template and complete tutorials with pictures included. There are no ads or video displays on the PDF so that you can print it, and it will be available for you anytime you need the tutorial for your next project. Click on the e-book cover image above to purchase.
Turn two pieces of fat quarter fabric into a DIY phone bag. #cellphonebag #miniphonebag Share on XMore Of Easy Sewing Bag And Pouch Tutorial For Your Next Project
- Oversized Beach Bag
- Quarter Keeper Keychain For The Shopping Cart
- Easter Bunny Treat Bags
- Candy Corn Treat Bags
- Mermaid Tail Bag Sewing Tutorial
DIY Crossbody Phone Bag From Fabric And Removable Strap
DIY Crossbody Cell Phone Bag Tutorial
This sewing tutorial is for making a phone pouch out of fabric as a mini crossbody cell phone bag with a flap, a pocket, and a removable strap.
Materials
- 1 sheet of fabric for the front side size 5" x 16" rectangle
- 1 sheet of fusible fleece or quilt batting for the front side size 5" x 7.75" rectangle
- 2 sheets of fabric for the back side with a flap size of 5" x 12" rectangles (one sheet for the inner and one for the outer layer)
- 1 sheet of fusible fleece or quilt batting for the back side size 5" x 12" rectangle.
- 1 sheet of fabric for the pocket size 5" x 14" rectangle
- Fabric for bag strap 3" x 52" or cut the bias tape for the strap into 52" long.
- Swivel lobster clasp
- Metal D ring
- Snap buttons and plier kit
Tools
- Disappeared ink fabric marker
- Chopstick
- Thread
- Scissors
- Ruler
- Sewing machine
- Ironing machine
Instructions
- For the pouch or front side, fold the fabric in half with the wrong side of it inside facing each other, mark the folding spot and draw the line.
- Put the batting or iron on fusible fleece on the wrong side of the fabric just below the marked line.
- Pin it or use quilting clips. Topstitch the folded side with 0.25" seam allowance.
- For the bag strap, if using the fabric, fold the long rectangle fabric in half with the wrong side of the fabric inside, and press it with an ironing machine. Then fold both long sides 0.5" inward and press it with an ironing machine.
- If using the double-sided bias tape, then topstitch the bias tape on both sides.
- Cut the strap into 2 pieces of 1.5" each. Attach the D rings on both tabs. Pin it for the tab on each side of the pouch 1" down from the top corners of folded fabric.
- Sew the tabs close to the raw edge to keep them in place so you can remove the pin or quilting clips.
- For the flap or back side, put the batting, outer and inner layers, with the right side facing each other.
- Measure 1" left, right, and down from the two corners on one of the shorter sides. Draw the line between the 1" mark. Then trim it on both corners along the marked lines.
- For the pocket, fold the fabric in half with the wrong side of the fabric inside facing each other. Topstitch on the folded line.
- To sew the cell phone bag together, sandwich all material in this order, batting for the flap, inner layer for the flap with the wrong side facing down, pouch side, pocket, and outer layer for the flap with the wrong side facing up.
- Make sure the tab is inside the fabric layers.
- Sew straight along the edge with 0.25" seam allowance, and skip 2" on the flap for the opening.
- Clip the extra material on each corner to reduce bulk.
- Trim the extra fusible fleece or batting close to the seam allowance stitch.
- Turn the bag right side out through the opening. Use the chopstick to push each corner. The pocket would be on the backside.
- Press the bag with the ironing machine, topstitch along the flap and sew the opening close at the same time.
- Attach the snap button on the pouch and the flap. Attach another pair of snap buttons on the back and pocket of the bag.
- Loop one end of the bag strap to the swivel lobster clasp, fold it once, then sew it along the fold. Repeat the process to attach the other swivel lobster clasp.
- Attach the swivel lobster clasp to the D ring.
- The DIY phone purse is ready to use now. The final size of this cell phone bag is around 4.5" x 7.75".
Notes
No need to press the iron-on fusible fleece now. You can iron it after turning the pouch right side out.


Leave a Reply