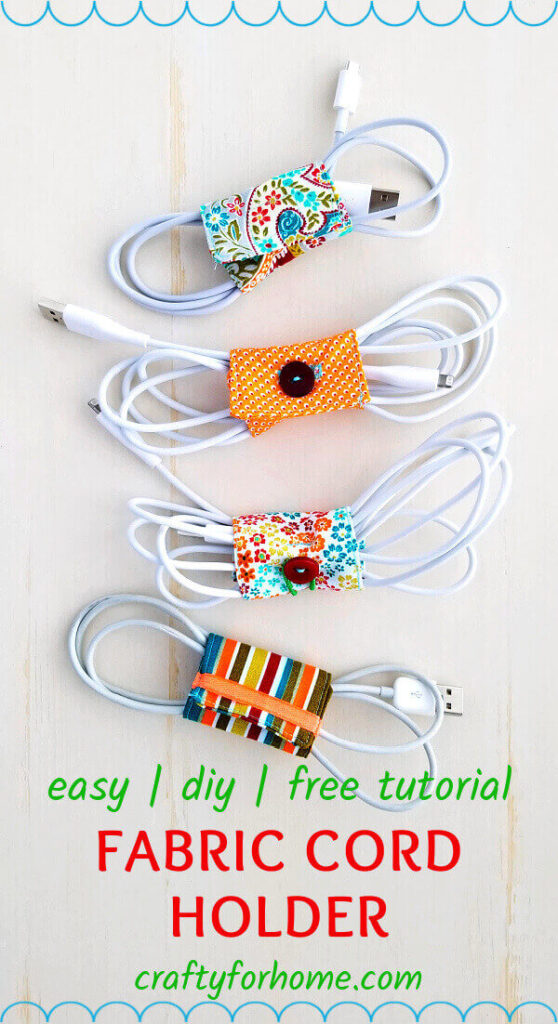
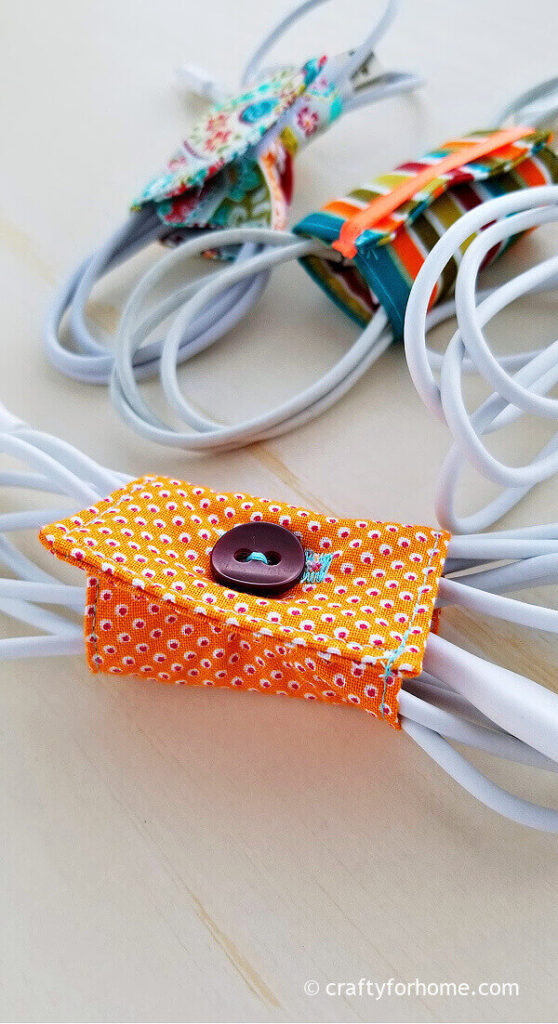
This easy sewing tutorial makes DIY fabric cord holders from charm packs by using four different fasteners.
Use This Guide To Make Fabric Cord Holder
When you have various gadgets in your house, you often wondering what would be the easy way to organize all those charger cables, so everyone can find the cord quickly when they need it.
As an Amazon Associate I earn from qualifying purchases. This post may contain affiliate links. Please see the Disclosure Policy for details.
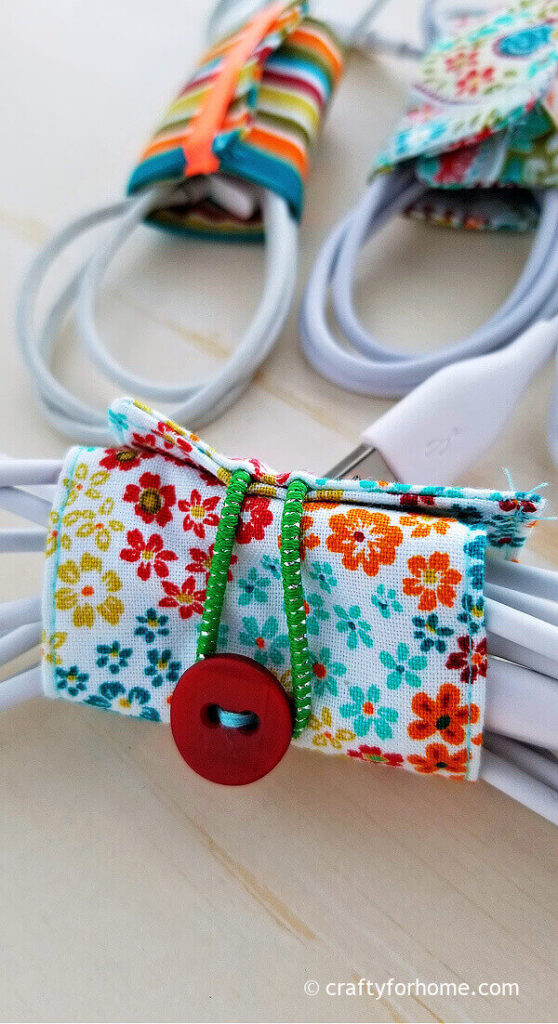
With this cable holder, there would be no more tangle and out of place cords. I know that I can use a hair tie or even a rubber band, but making the fabric one is prettier.
My kids also bring earbud to school, and I often find them super tangle on their backpack pocket even though I provide a pouch or ziplock bag for it. This little cable holder will keep the earbud cord wrapped for easy storage.
What You Need To Make Fabric Cord Wrap
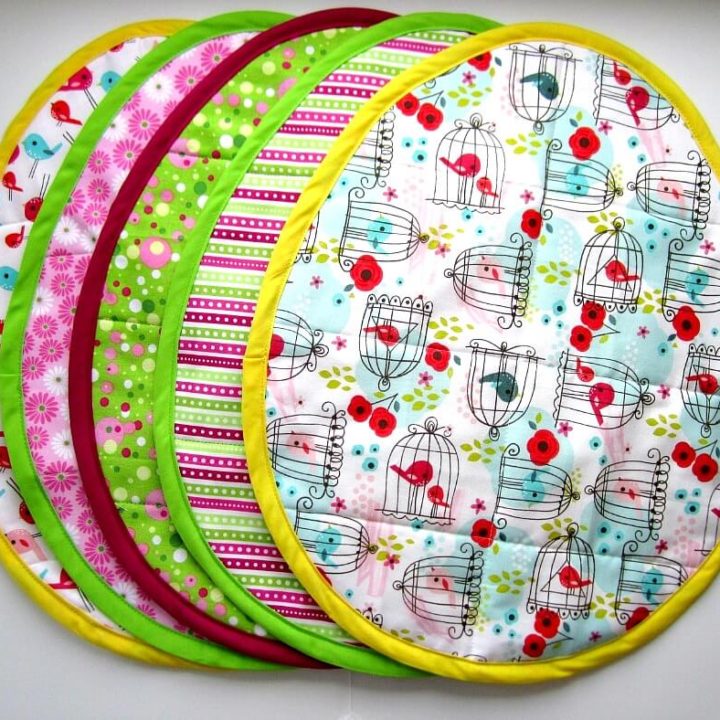
You can make this cord wrap from any fabric scraps you have available. Worn out shirts, jeans, pillowcase, even an apron are fine to use for this project. I use 5 inches square charm pack fabric for this project same as the sanitizer cozy I made a while ago.
Use the ribbon to keep the cord stay on the fabric holder. You can make a little fabric strip if no ribbon available.
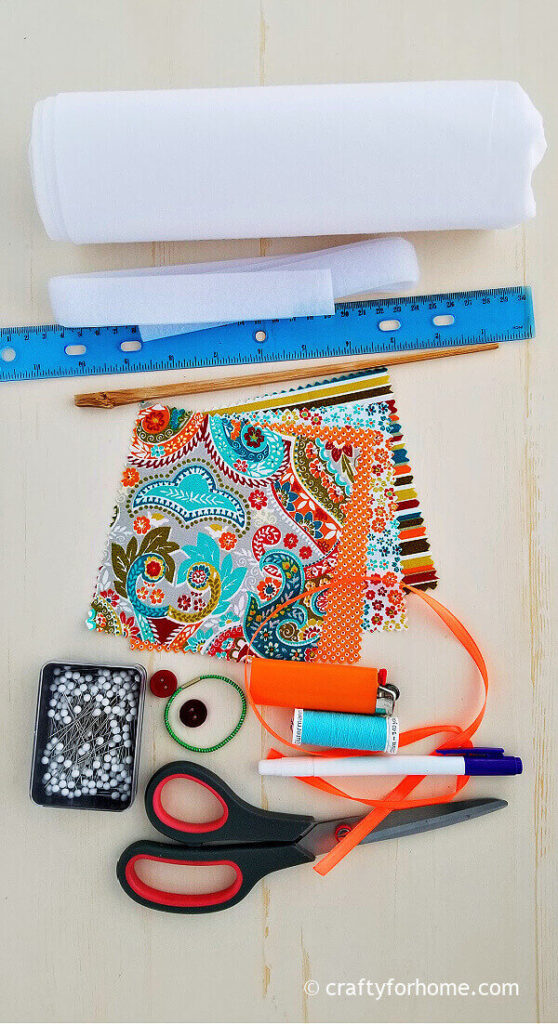
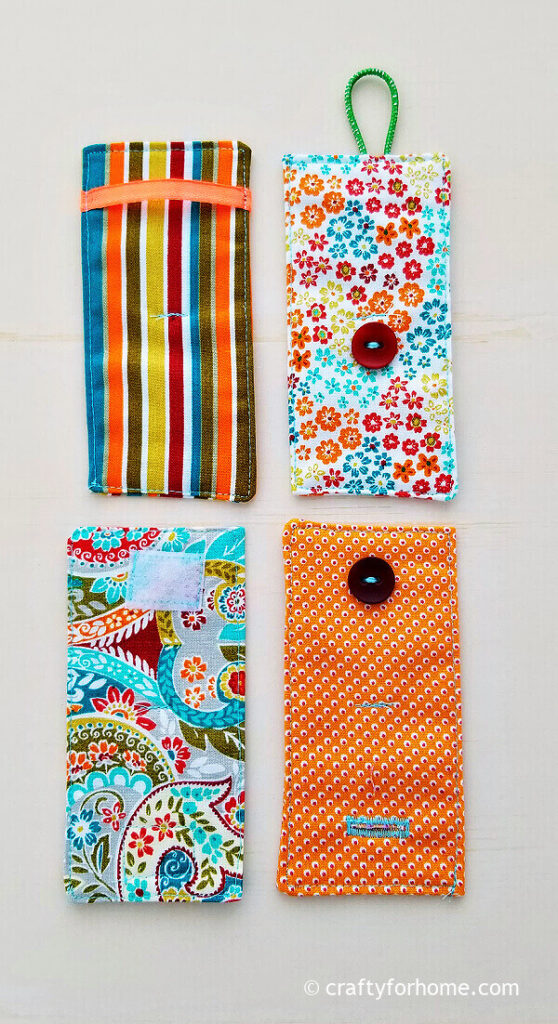
I like to use velcro to keep it in place. But I will show you four different ways by using velcro, button with an elastic hair tie, make a buttonhole, or ribbon.
- Charm packs bundle or fabric scraps 5 inches square
- Ribbon
- Fusible interfacing, I use this iron on fusible interfacing
- Velcro, or thin hair tie elastic, or button
- Pin
- Thread
- Pencil or chopstick
- Disappeared ink fabric marker
- Sewing machine, I use the Singer one. The computerized Brother sewing machine has the buttonhole stitch as well.
- Hand sewing needle
- Scissors
- Seam ripper
- Buttonhole foot
- Lighter
- Ironing machine
How To Make Fabric Cord Holder
Here are four different tutorials to make the cord holder. Super easy, and you can make one in just under 10 minutes.
Cord Holder With Velcro
See the Cord Holder With Velcro video tutorial here.
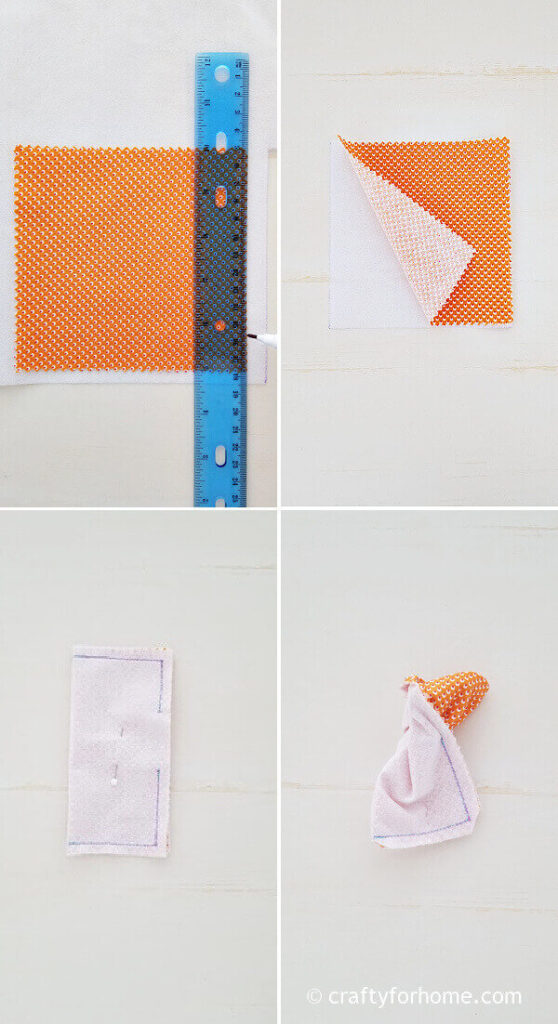
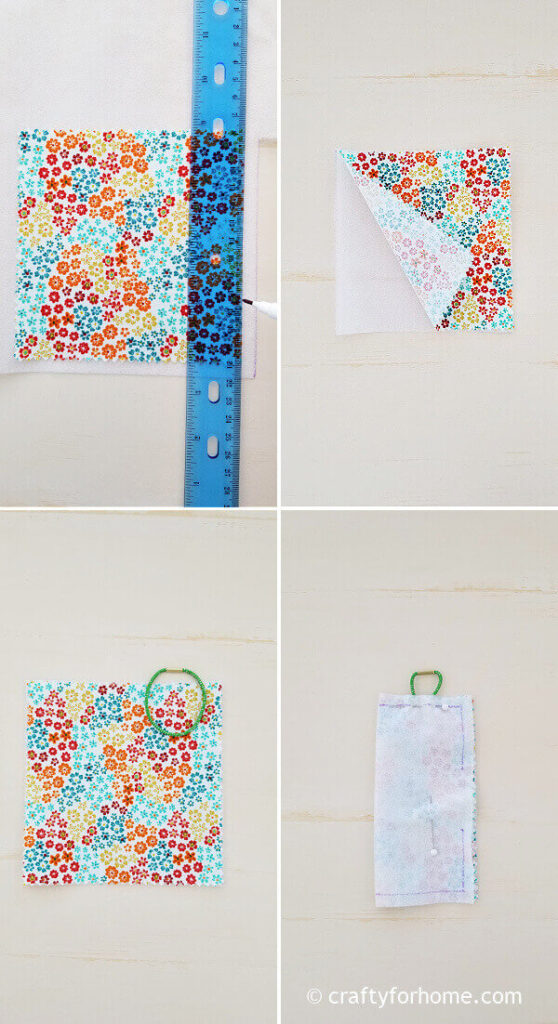
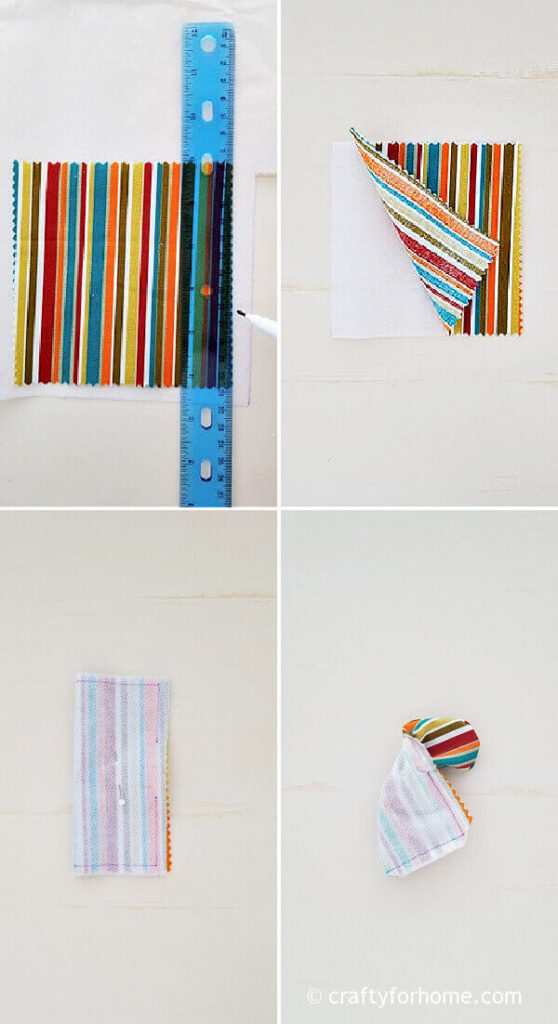
Cut the fusible interfacing 5″ x 5″, the same size as the fabric square.
Cut 2.5 inches ribbon and use the lighter to seal the raw edge to prevent fraying. You can also use a fabric strip or bias tape.
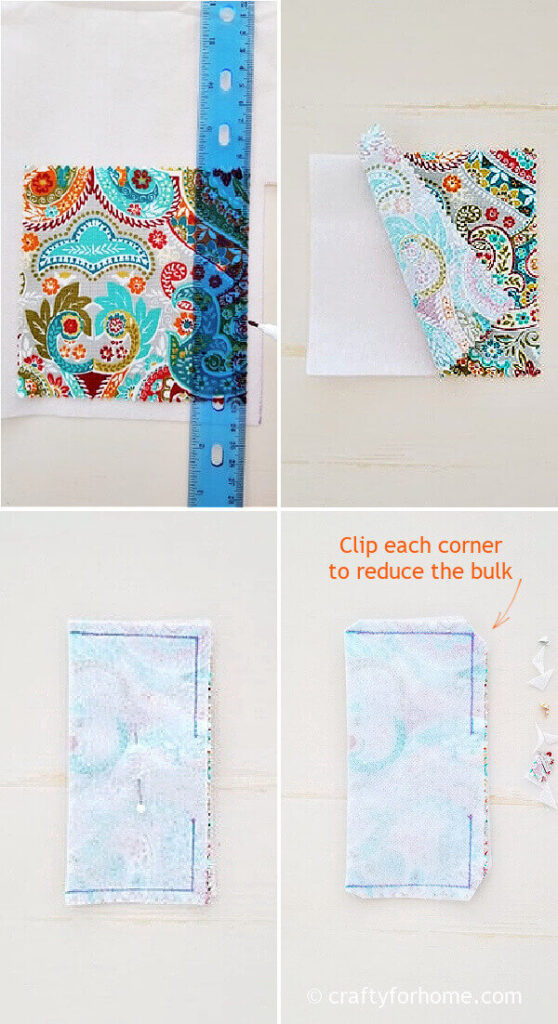
Put the fusible interfacing on the wrong side of the fabric. Fold the fabric in half.
Mark the line for 1/4 seam allowance. Sew straight along the line and skip 2″ for the opening.
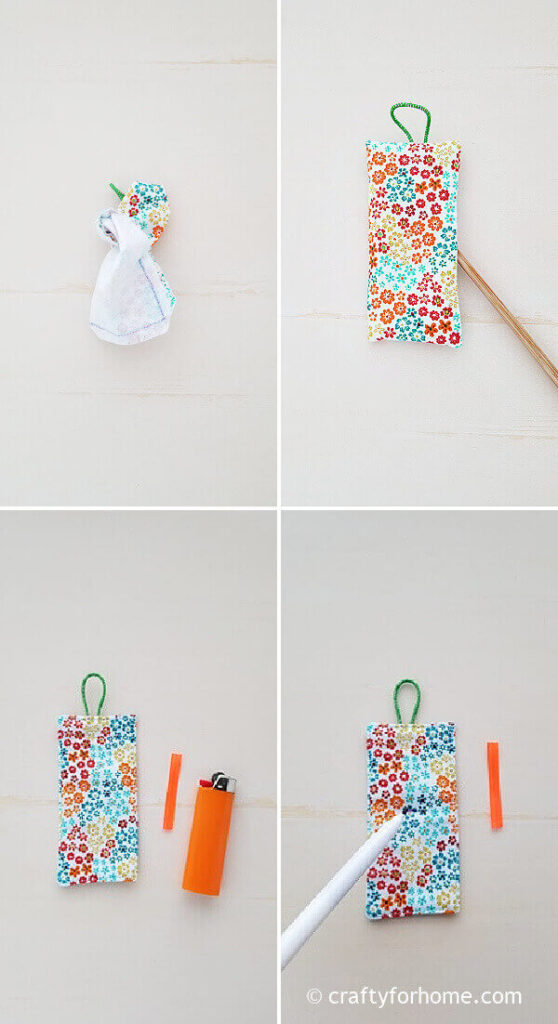
Clip all four corners to reduce the bulky corner once the cord holder ready.
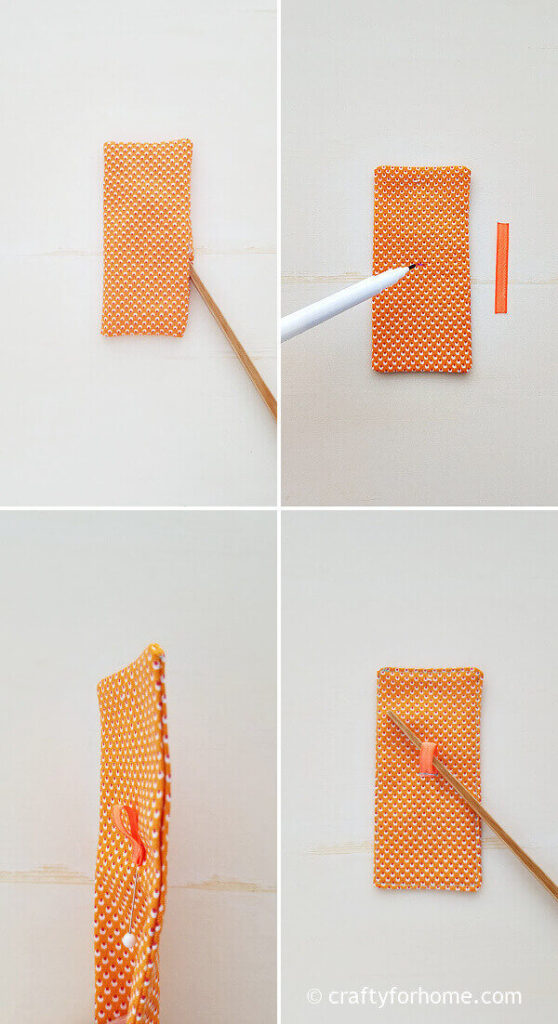
Turn it right side out and use a chopstick to push each corner.
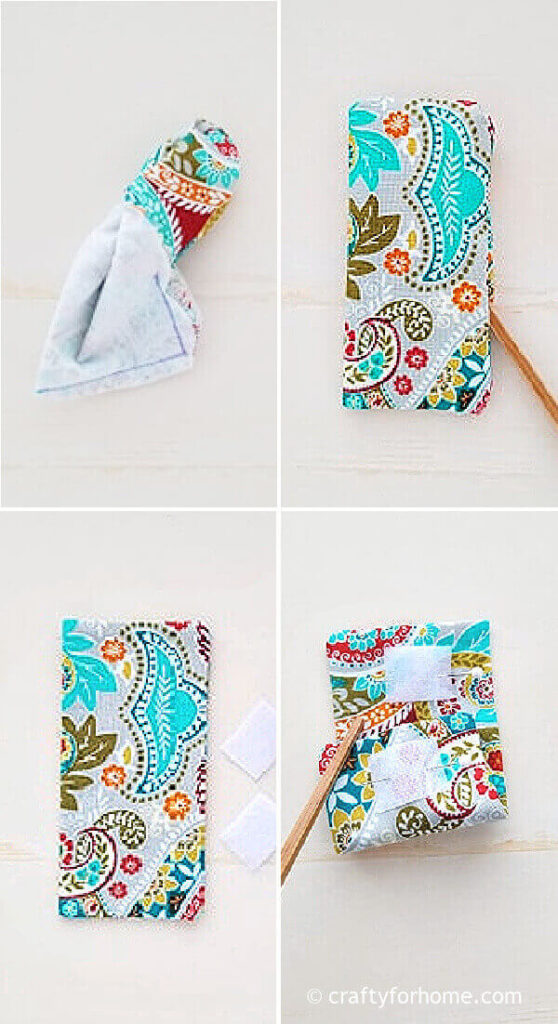
Press it with an ironing machine if it looks wrinkle. Topstitch along the hem and close the opening at the same time.
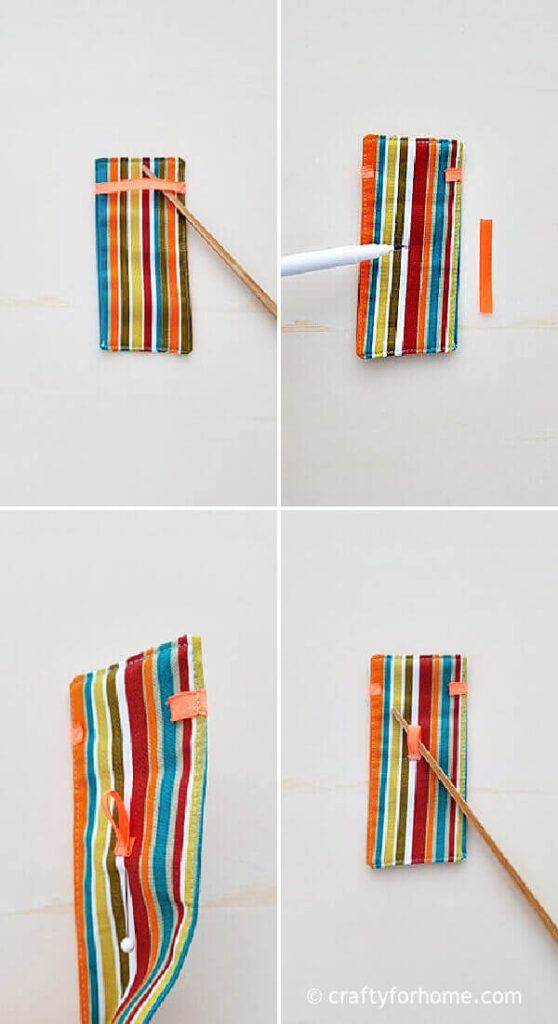
Cut 0.5 inch of velcro, sew the velcro’s rough side (the hook) on one of the fabric’s short edges.
Sew the velcro’s soft side (the loop) on the opposite side of the other short edge.
Make sure both velcro pieces are aligned with each other when you fold the fabric holder.
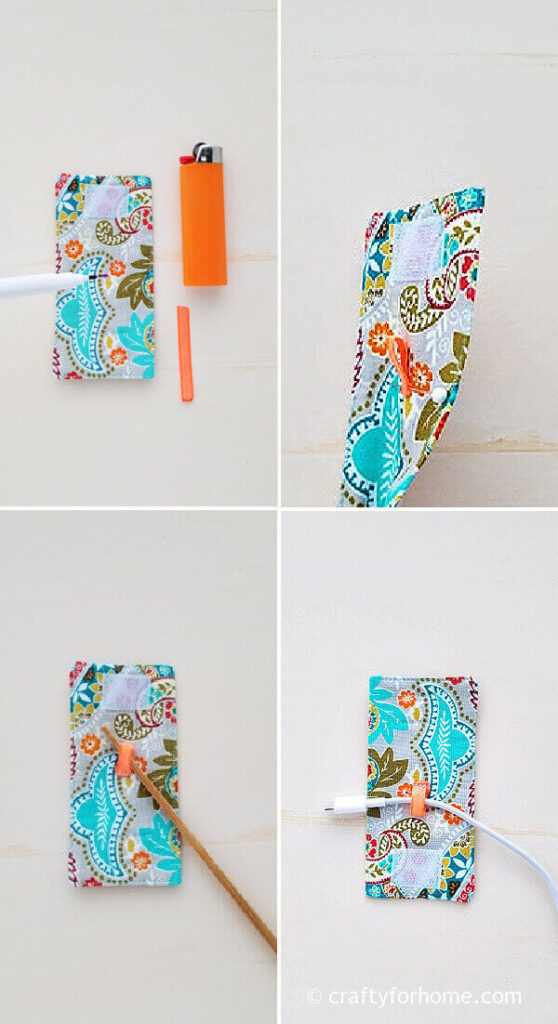
Fold the fabric holder in half, mark the center point inside. Sew both ends of the ribbon in the middle of the fabric holder.
Insert the cord through the ribbon loop. Roll the cord and wrap it.
Cord Holder With Buttonhole
See the Cord Holder With Buttonhole video tutorial here.
Cut the fusible interfacing 5″ x 5″, the same size as the fabric square.
Cut 2.5 inches ribbon and use the lighter to seal the raw edge to prevent fraying. You can also use a fabric strip or bias tape.
Put the fusible interfacing on the wrong side of the fabric. Fold the fabric in half.
Mark the line for 1/4 seam allowance. Sew straight along the line and skip 2″ for the opening.
Clip all four corners to reduce the bulky corner once the cord holder ready.
Turn it right side out and use a chopstick to push each corner.
Press it with an ironing machine if it looks wrinkle. Topstitch along the hem and close the opening at the same time.
Fold the fabric holder in half, mark the center point inside. Sew both ends of the ribbon in the middle of the fabric holder.
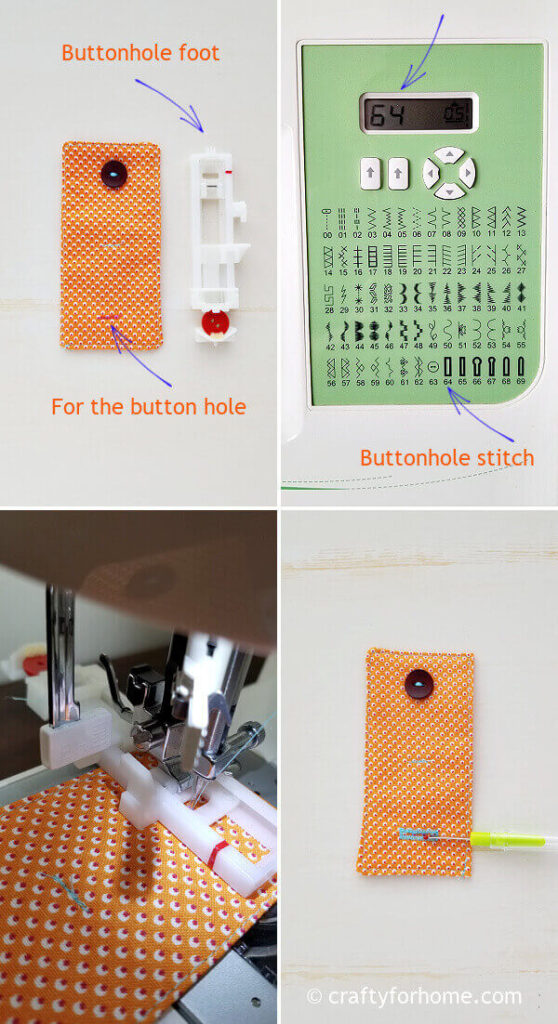
Choose the buttonhole stitch on your sewing machine if you have an option like mine.
Put the button you are going to use on the buttonhole foot. Start stitching the buttonhole about 1 inch from one of the short edges of the fabric.
Use the seam ripper or small pointy scissors to open up the buttonhole.
Sew the button on the other short edges of the fabric.
Insert the cord through the ribbon loop. Roll the cord and wrap it.
Cord Holder With Button And Hair Tie Elastic
See the Cord Holder With Elastic video tutorial here.
Cut the fusible interfacing 5″ x 5″, the same size as the fabric square.
Cut 2.5 inches ribbon and use the lighter to seal the raw edge to prevent fraying. You can also use a fabric strip or bias tape.
Put the fusible interfacing on the wrong side of the fabric. Put the elastic and fold the fabric in half.
Add 1/4 inch seams allowance. Sew along the edge and skip two inches for the opening. Cut the extra elastic.
Clip all four corners to reduce the bulky corner once the cord holder ready. Turn it right side out and use a chopstick to push each corner.
Press it with an ironing machine if it looks wrinkle. Topstitch along the hem and close the opening at the same time.
Fold the fabric holder in half, mark the center point inside. Sew both ends of the ribbon in the middle of the fabric holder.
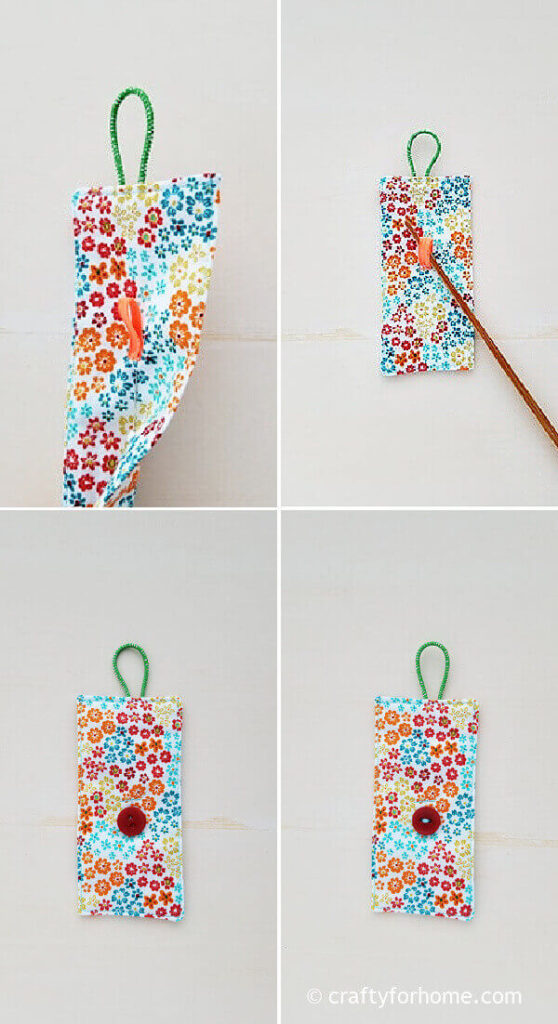
Sew the button 2 inches from the other short edges of the fabric.
Insert the cord through the ribbon loop. Roll the cord and wrap it.
Cord Holder With Ribbon
See the Cord Holder With ribbon video tutorial here.
This fabric cord holder with a ribbon for the fastener will look the same way as a belt.
Cut the fusible interfacing 5″ x 5″, the same size as the fabric square.
Cut 2.5 inches ribbon and use the lighter to seal the raw edge to prevent fraying. You can also use a fabric strip or bias tape.
Add 1/4 inch seams allowance. Sew along the edge and skip two inches for the opening. Clip all four corners to reduce the bulky corner once the cord holder ready.
Turn it right side out and use a pencil or chopstick to push each corner. Press it with an ironing machine if it looks wrinkle.

Cut the ribbon 3 inches long. Pin it an inch from the one short end of the fabric. Topstitch along the hem over the ribbon, and close the opening at the same time.
Fold the fabric holder in half, mark the center point inside. Sew both ends of the ribbon in the middle of the fabric holder.
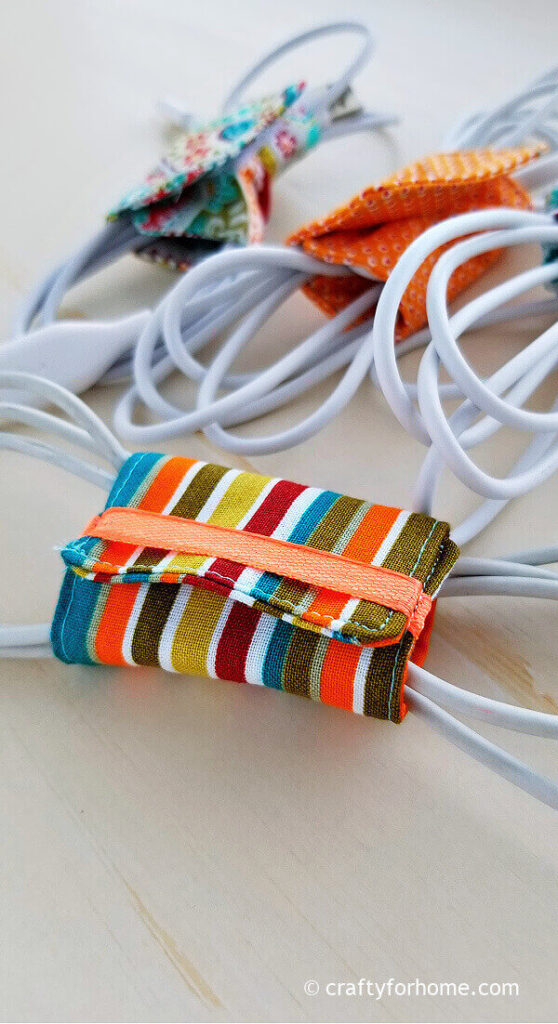
Insert the cord through the ribbon loop. Roll the cord and wrap it.
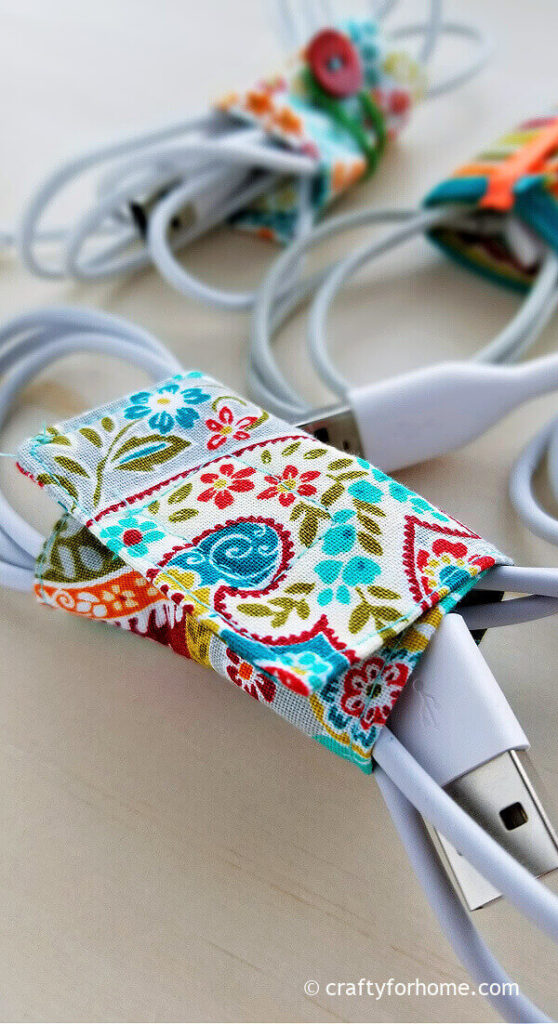
Use the charm pack square or fabric scraps to make these four different ways fabric cord holders. #fabriccordholder #cordkeeper Share on XThe ribbon loop in the middle is for keeping the fabric holder attach to the cable so that you won’t lose both of them. Once you are finished using it, roll the cord, wrap it, and secure it with the fastener you use for easy storage.
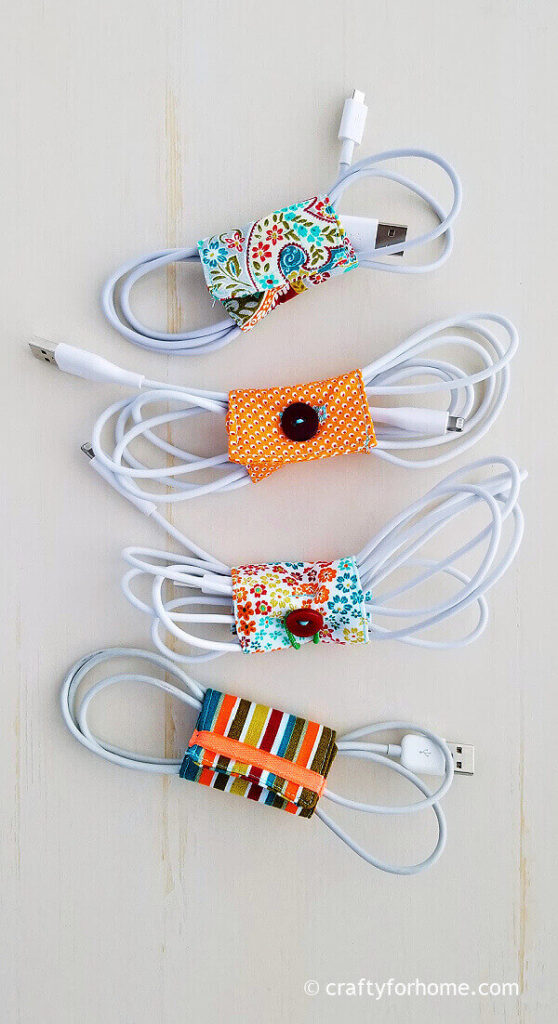
Which one is your favorite from these four fabric cord holders? All are easy and simple to make and do the job for the purpose.
DIY Cord Organizers
This cord organizer is a perfect sewing project for repurposing worn-out clothing or pillowcase into something new and useful for around the house. From one pillowcase, you will have more than a dozen of the fabric cord keeper.
I use cotton quilt fabric from the charm pack bundle because I love the mix and match fabric prints on both sides of the cord wrap.
When you have too many gadgets in the house from phones, iPad, laptops (it seems like it is a must to have these gadgets this day for various reasons), you can organize all these charger cables with this fabric cord organizer.
More Of Easy Sewing Project By Using Fabric Scraps
- Easy Fabric Ornaments
- Easy Fabric Gift Card Holder
- Easy Fabric Heart Garland
- Easy Fabric Bookmarks
- Easy Ruffled Fabric Key Fob Holder
- Easy Freezie Cozy
- Easy Hand Sanitizer Holder
If you like different materials like leather and love the ready-made one, you can get some of the cord holders here. This one is the cat-shaped cord holder, this one is the dog-shaped cord holder, and this one is the flower-shaped cord holder.
Make This DIY Fabric Cord Wrap From Fabric Scraps

You May Also Like

Easy Binding Mug Rug
Easy sewing craft on how to make a mug rug with the easy binding tutorial using the backside of the fabric.
Easy Oval Mug Rug Tutorial
This sewing project is for how to make an oval mug rug without binding as a quick DIY gift idea for anyone who loves to enjoy a cup of coffee or cozy tea time.
How To Sew Easter Egg Placemat
These Easter egg placemat tutorials are easy to follow and fun to do for Easter sewing project ideas, and you can do it in one afternoon.


Leave a Reply