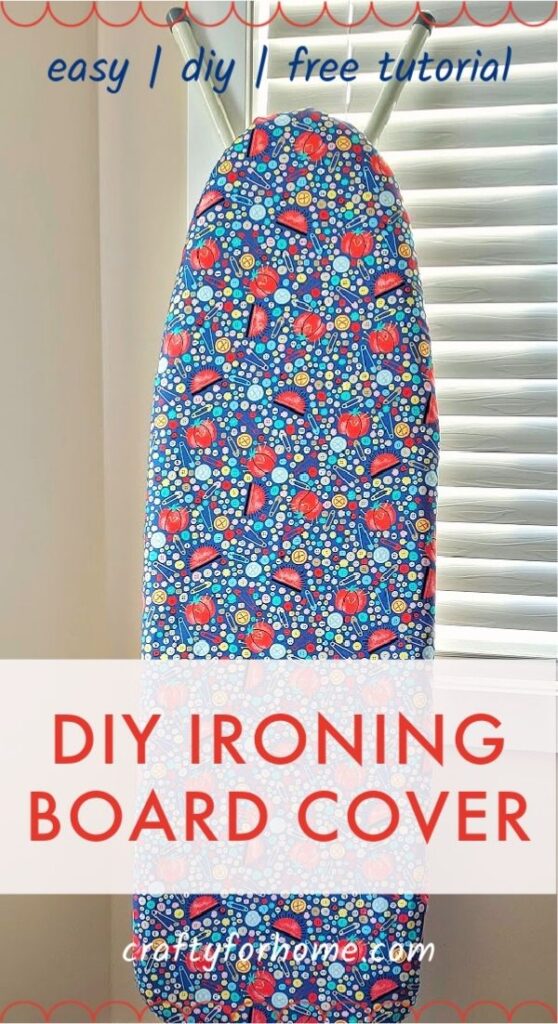
This easy sewing tutorial is to recover an ironing board with a new fabric when the ironing board cover is already worn out and needs a new cover.
Make Your Own DIY Ironing Board Cover
Suppose you already made the bowl cover from fabric (unrelated to the ironing activity, but it is a fun project). In that case, it is time to recover your ironing board pad as easy DIY to update your sewing room or brighten up your laundry room.
As an Amazon Associate I earn from qualifying purchases. This post may contain affiliate links. Please see the Disclosure Policy for details.
Even though ironing is like a chore, you still want the board cover to look nice and crisp. Unfortunately, the ironing cover looked worn-out over the years, stained from the ironing mark, and ripped on some spot like this one.
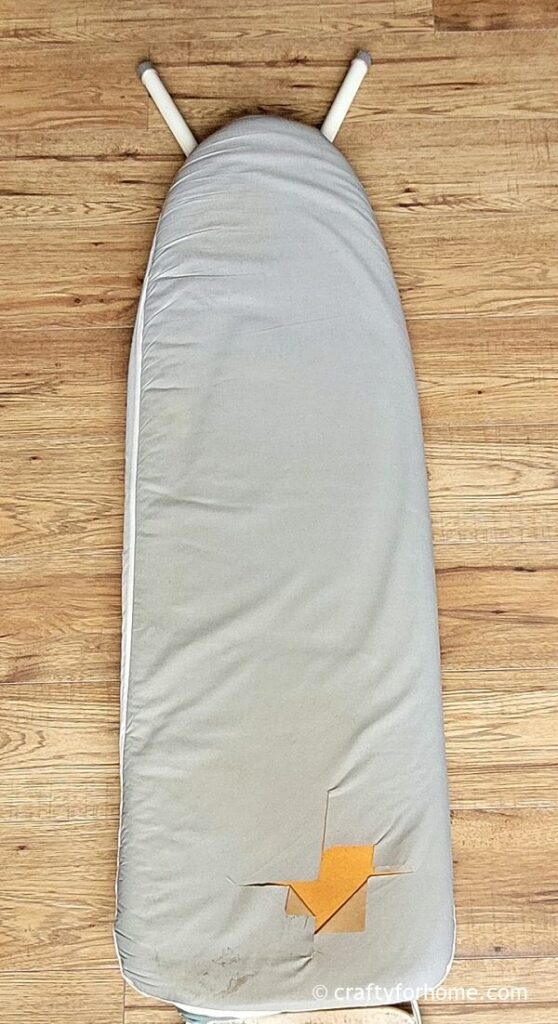
Yes, that is the latest condition of my ironing board cover, sad-looking thing, and ready for a makeover.
Buying the ready one is probably the easiest way, similar to the sad-looking one I use here. But a lovely fabric print and color will likely make a better mood for doing this ironing chore.
I also use this fun sewing-themed fabric print for a cork board makeover to match the ironing board.
What Is The Best Fabric For Ironing Board Cover
You want to use the fabric for the ironing board cover that is heat resistant and avoid the material that can trap steam and melt easily like sateen.
The quilting cotton fabric is the best material for ironing board cover as it is a natural fiber, heat resistant, and comes with so many prints you like.
The medium-weight cotton-like home decor fabric is also great to use for this project. But I prefer quilting cotton as it is an inexpensive fabric.
Use the darker color fabric or printed fabric instead of bright color and plain. The darker shade can easily hide stains from using ironing overtimes.
How Much Fabric Do You Need For An Ironing Board Cover
Depending on the size of your ironing board, you might need more fabric or less. Typically, the tabletop ironing board is smaller than the free-standing one.
I use the ironing board size 43 inches long and 13 inches wide. So I use 1.5 yards/135 cm of fabric.
You would need fabric at least 8 inches longer than the ironing board length and 8 inches wider than the ironing board width.
Best Padding For An Ironing Board
Cotton quilt batting is one of the best paddings for an ironing board. You can also use this Insul-Bright, this wool padding, or this wool pressing mat for the smaller ironing board.
Use double or triple layers quilting batting for good padding support, but it is not too soft from the surface. Or use the existing pad from your worn-out cover as I do.
Supply For Replacing Ironing Board Cover
- 135 cm or 53 inches or close to 1.5 yards of cotton quilt fabric
- Cotton quilt batting or Insul Bright batting or reuse the existing one from the worn-out cover
- Disappeared ink fabric marker, my favorite one is this dual-purpose fabric marker.
- 57.5 inches or 146.3 cm elastic 1/4 inch size, like this elastic. The iron board circumference is around 266 cm / 104.7 inches. To determine the length of the elastic, see the helpful tips below.
- Scissors
- Ruler
- Pin
- Thread
- Sewing machine
Helpful Tips: If your board has a different size than mine, use this easy formula to determine the length of the elastic, total circumference of the iron board subtract 45%.
Tutorial For Making Ironing Board Cover
The video tutorial is also available. Here is the link to watch the DIY Ironing Board Cover video tutorial on my YouTube channel and subscribe for more videos.
The easiest way to measure the fabric and cut it to get the ironing board’s shape is by turning the board upside down. Then put the ironing board on top of the fabric you are going to use.
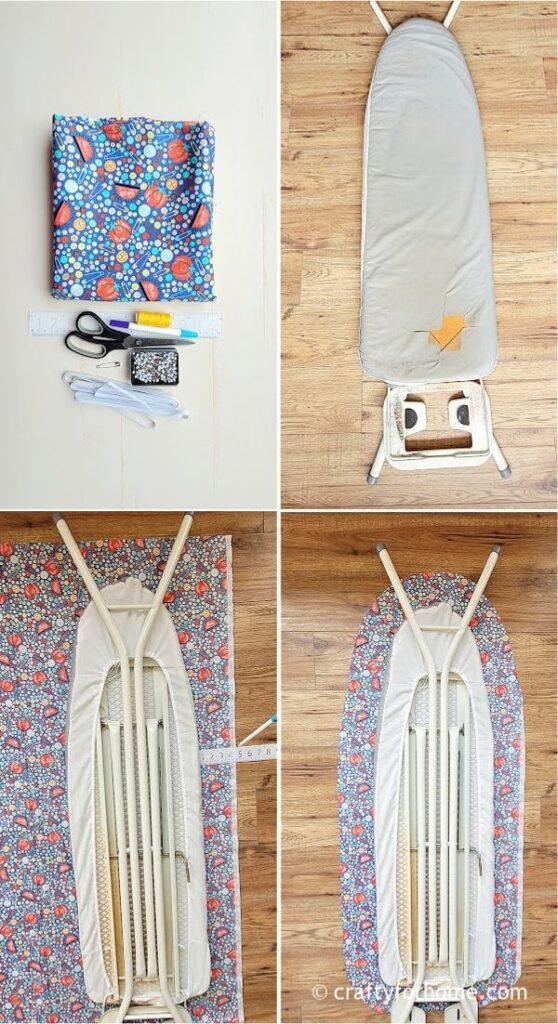
Lay the fabric on the floor or table with the wrong side of the fabric facing up. Turn the ironing board down and lay it on top of the fabric.
Use the ruler and fabric marker. Mark the dash lines 4 inches from the board. Connect all the dash lines. This extra fabric includes the seams allowance. Cut the fabric along the marked line.
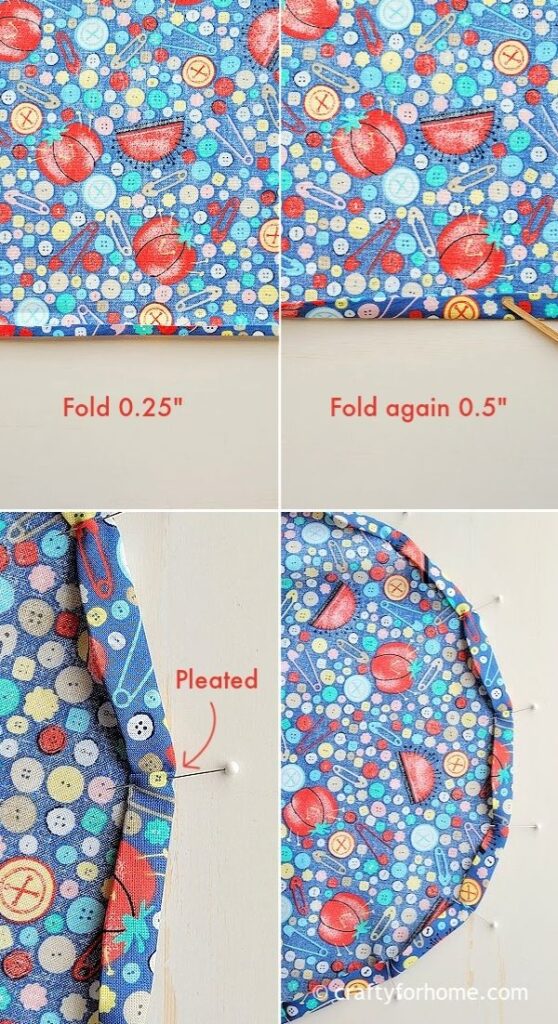
Put the fabric on a flat area with the wrong side facing up, fold the edge about 0.25 inches inward. Then fold another 1/2 inch again.
Make sure it is enough room for the elastic channel. For the curve side, make several one-pleated folds.
Press the folded edge with the ironing machine and pin it.
You will notice that the curve’s folded edge doesn’t look neat, don’t worry about it. It won’t be visible once you put the cover on.
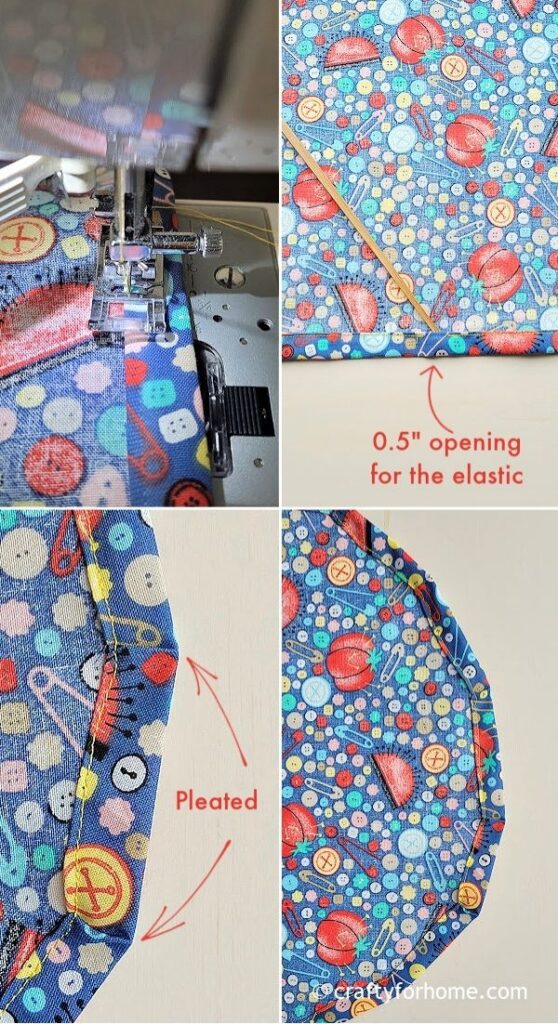
Sew along the folded hem, and skip 0.5 inches for inserting the elastic.
Attach the safety pin on one end of the elastic, then thread the elastic through the channel.
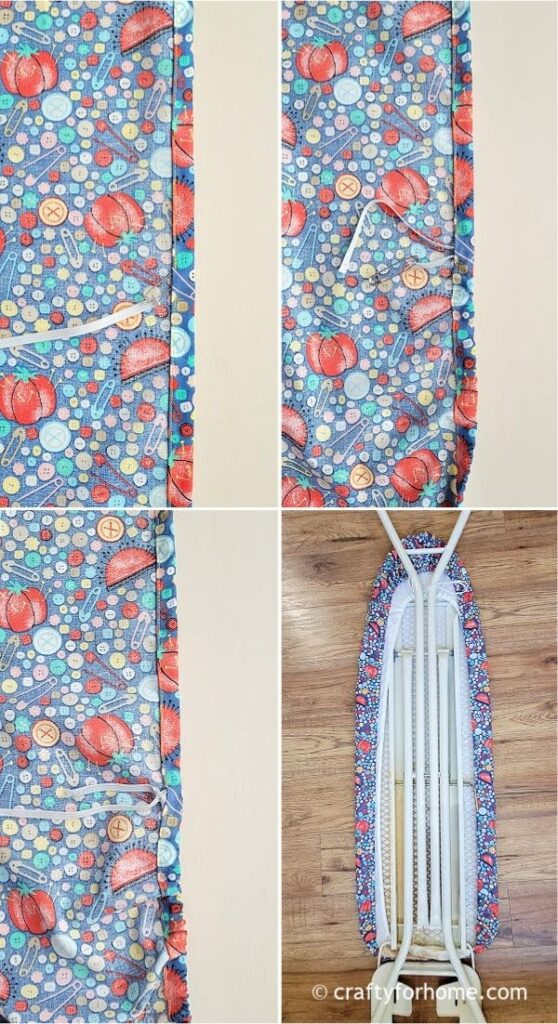
Pull the fabric to ease around the channel, so it doesn’t look bulky on one side.
Use the safety pin to secure the elastic. Next, you can sew both elastic ends together, backstitch it multiple times, tuck it inside the channel, or make double knots to secure it.
You can stitch the opening closed or leave it open if you need to replace the elastic later. Wrap the ironing board with the new cover on top of the worn-out one.
Even though this is for the free-standing ironing board, you can also use this tutorial for the mini tabletop ironing board. Or make the small board from the TV tray table.
Replace the elastic with a drawstring if you like. You can also use double-fold extra wide bias tape for the channel.
Since cotton is the best material for ironing board covers, you can use cotton table cloth or bed sheet that you don’t use anymore. It is a perfect upcycle sewing project, and you don’t have to look for new fabric if it is not available on hand.
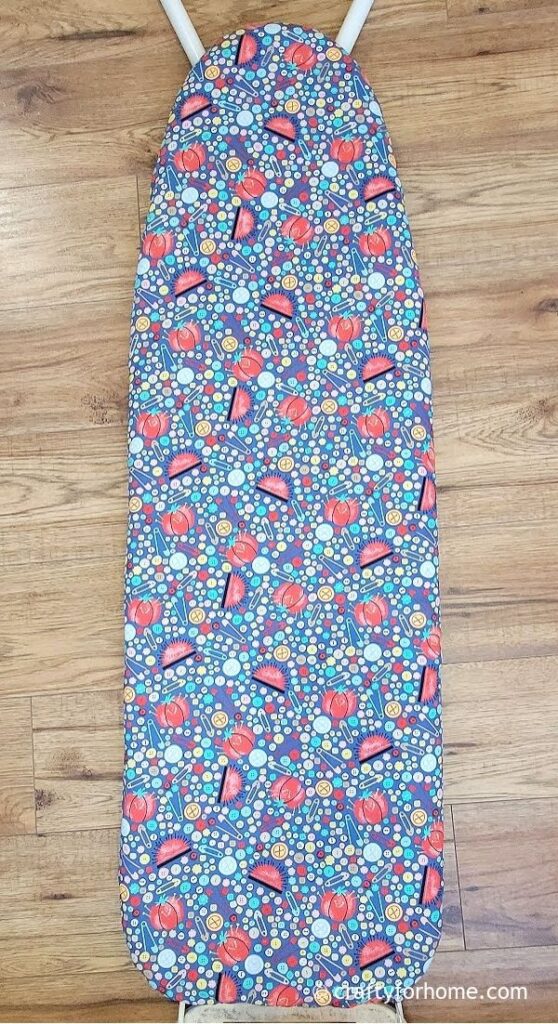
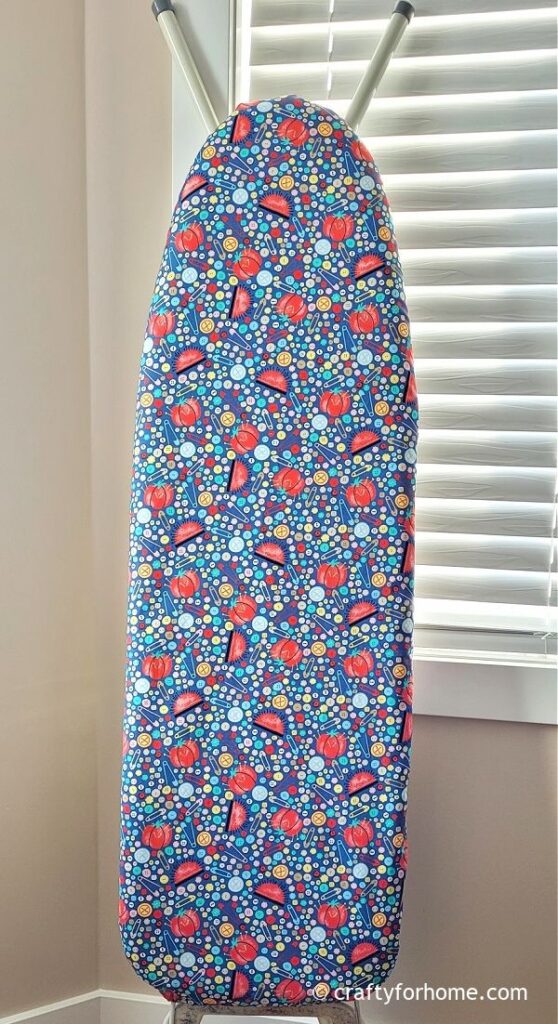
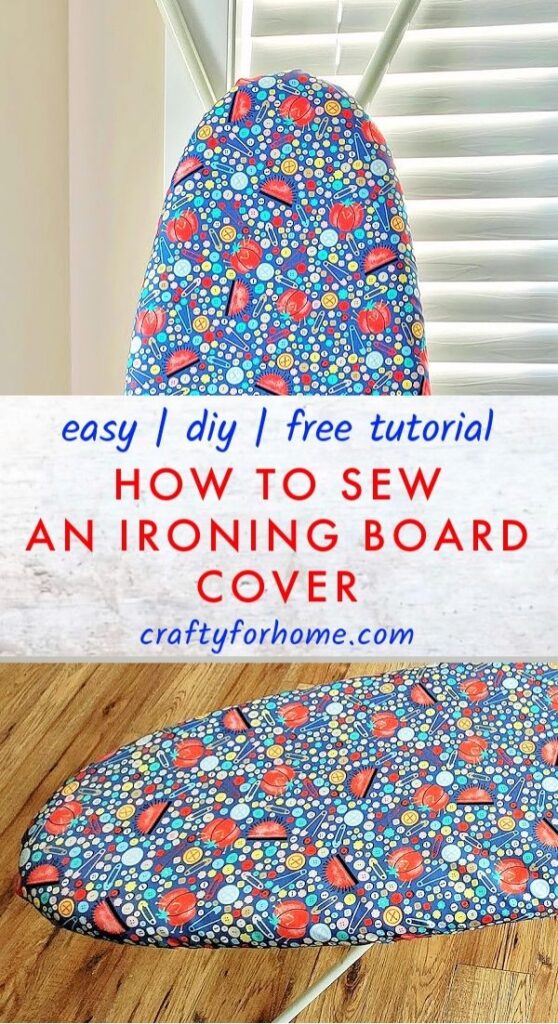
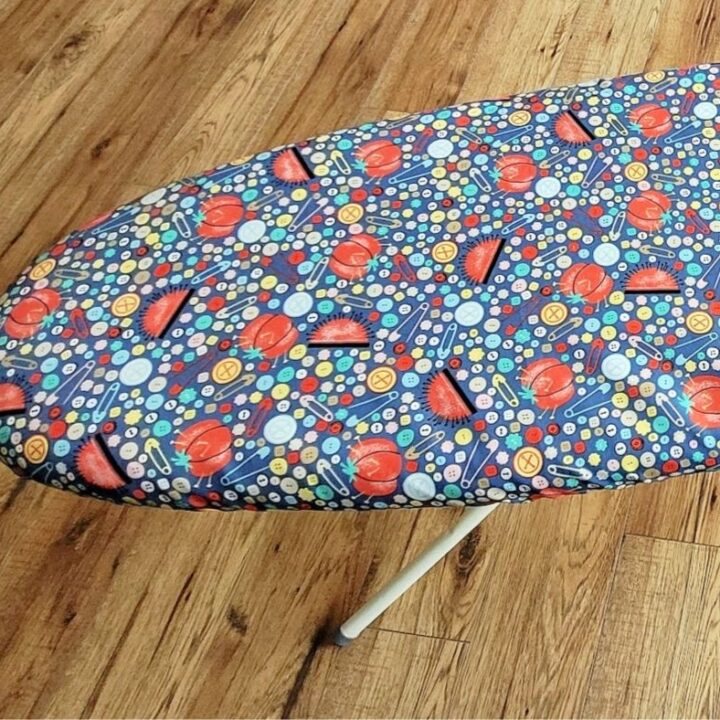
This custom-made ironing board cover gave me a big smile on my face! No more sad-looking cover, no more weird-looking stain on the fabric.
Recover your worn-out ironing board cover with this easy tutorial. #recoverironingboard #customizedironingboardcover Share on XMore Of Easy Sewing Project For The House
- How To Sew Zippered Cushion Cover
- How To Make Oval Shaped Placemat
- How To Make Mitered Corner Cloth Napkins
- Easy Binding Mug Rug
- Easy Oval Mug Rug
- Tissue Box Cover Tutorial
- Soup Bowl Cozy Tutorial
Make An Ironing Board Cover From Scratch With This Easy Tutorial
Easy Tutorial To Recover An Ironing Board
This easy sewing tutorial will guide you to make an ironing board cover when it is already worn out and needs to recover.
Materials
- 135 cm or 53 inches or close to 1.5 yards of cotton quilt fabric.
- Cotton quilt batting, Insul-Bright batting, or reuse the existing one from the worn-out cover.
- 57.5 inches or 146.3 cm elastic 1/4 inch size, (the iron board circumference is around 266 cm / 104.7 inches ). To determine the length of the elastic, see the notes below.
Tools
- Scissors
- Disappeared ink fabric marker.
- Ruler
- Pin
- Thread
- Sewing machine
Instructions
- Lay the fabric on the floor or table with the wrong side of the fabric facing up.
- Turn the ironing board down and lay it on top of the fabric.
- Use the ruler and fabric marker. Mark the dash lines 4 inches from the board.
- Connect all the dash lines. This extra fabric includes the seams allowance.
- Cut the fabric along the marked line.
- Put the fabric on a flat area with the wrong side facing up, fold the edge about 0.25 inches inward. Then fold another 1/2 inch again.
- Make sure it is enough room for the elastic channel. For the curve side, make several one-pleated folds.
- Press the folded edge with the ironing machine and pin it.
- You will notice that the curve's folded edge doesn't look neat, don't worry about it. It won't be visible once you put the cover on.
- Sew along the folded hem, and skip 0.5 inches for inserting the elastic.
- Attach the safety pin on one end of the elastic, then thread the elastic through the channel.
- Pull the fabric to ease around the channel, so it doesn't look bulky on one side.
- Use the safety pin to secure the elastic. Next, you can sew both elastic ends together, backstitch it multiple times, tuck it inside the channel, or make double knots to secure it.
- You can stitch the opening closed or leave it open if you need to replace the elastic later.
- Wrap the ironing board with the new cover on top of the worn-out one.
Notes
- You would need fabric at least 8 inches longer than the ironing board length and 8 inches wider than the ironing board width.
- If your board has a different size than mine, use this easy formula to determine the length of the elastic, total circumference of the iron board subtract 45%.
- Make sure to see the complete steps of picture tutorials in the post for more detailed instructions.


Leave a Reply