The sewing tutorial to make an insulated casserole carrier sleeve style makes it easy to transport your favourite dish to any gathering and keep the food warm.
DIY Casserole Carrier
Carrying your favourite casserole for a potluck party or family gathering will be much easier, especially during the holiday season, using this insulated casserole carrier to keep the food warm.
As an Amazon Associate I earn from qualifying purchases. This post may contain affiliate links. Please see the Disclosure Policy for details.
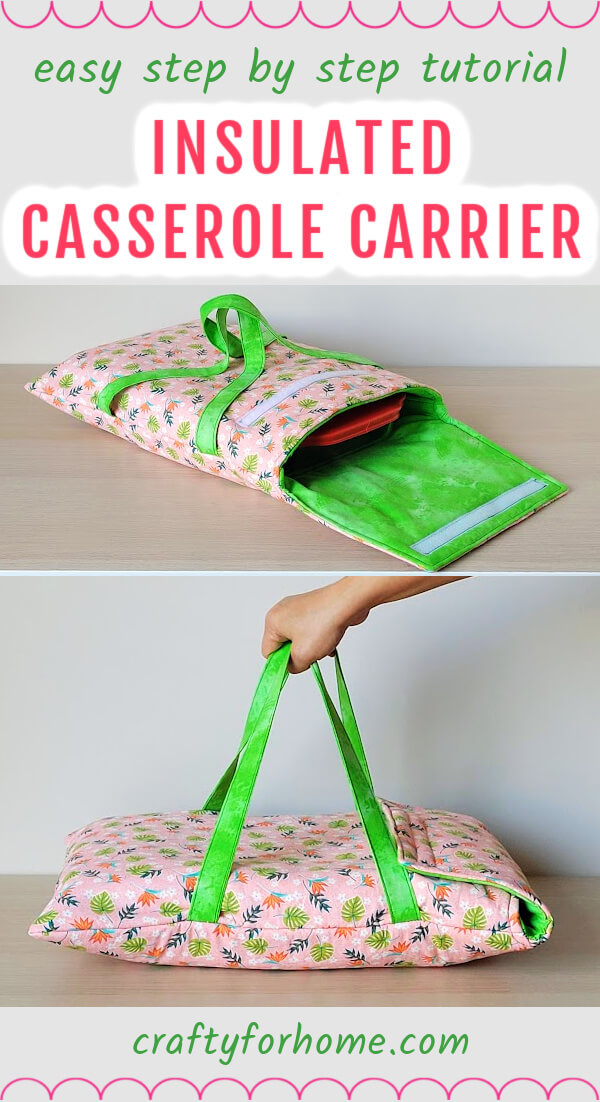
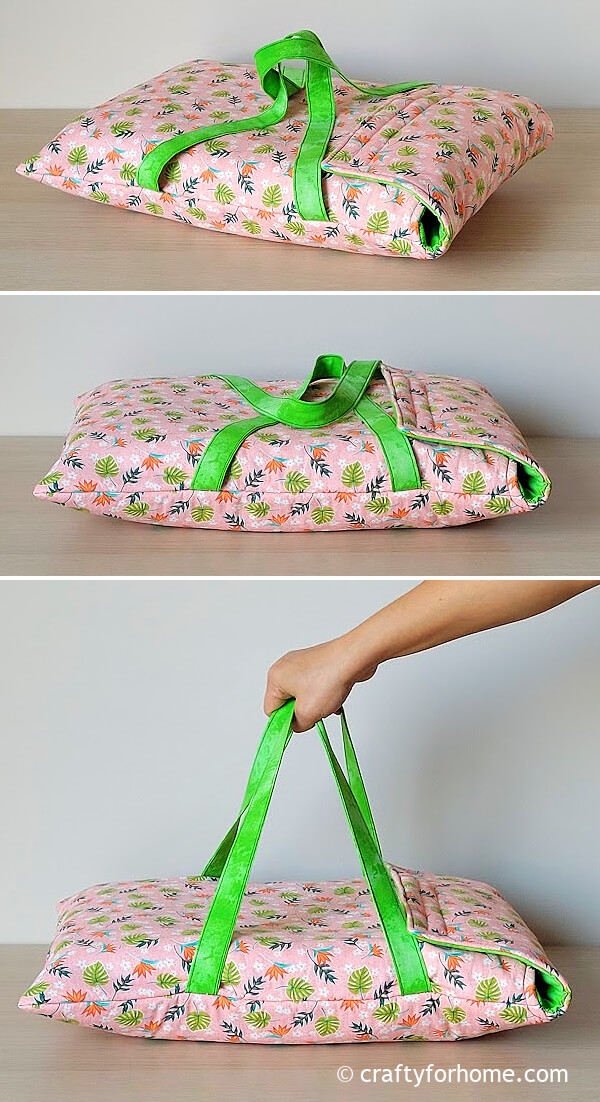
The carrier is for a 9 x 13 inches pan up to 3 inches deep. Carefully slide the pan into the pouch, close the flap and attach the hook and loop.
The casserole carrier is like a sleeve style, similar in shape to the laptop sleeve, but it uses a different way to make it.
Supply To Make Casserole Carrier Sleeve
From half-yard fabric, or 18 x 44 inches, there would be enough material for one sleeve layer and the strap for the handle.
So, to make this casserole tote carrier, use two half yards of fabric with different prints or colours for the inner and outer layers or one yard fabric for both inner and outer layers.
Use thin cotton batting for this project. You can use only 1/2 yard of cotton batting for one layer if it is too thick.
If there is not much fabric left for making the strap, use one piece of fat quarter-size fabric and this fabric strap tutorial. Also, you can use a webbing strap specifically for a bag.
Note: anything with insulation or Insul-Bright is not for microwave use.
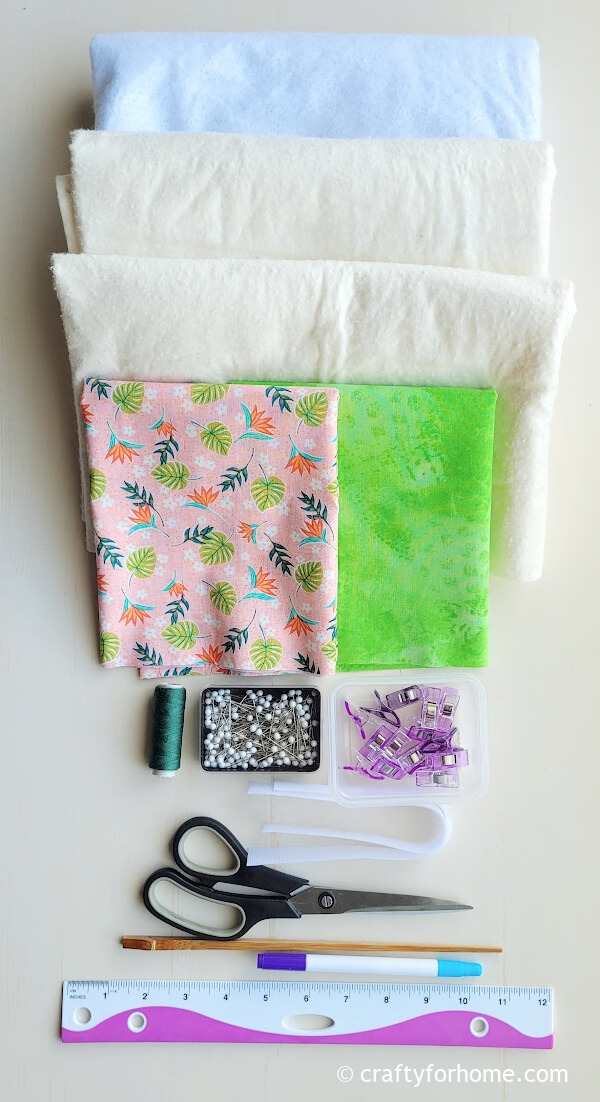
- 1/2 yard fabric for the outer layer
- 1/2 yard fabric for the inner layer
- 1 yard cotton batting
- 1/2 yard Insul-Bright insulated lining
- 9″ sew-on hook and loop
- Disappeared ink fabric marker. I always use this dual-purpose marker
- Pin or quilting clips
- Thread
- Chopstick
- Ruler
- Scissors
- Ironing machine
- Sewing machine
Casserole Carrier Tutorial
The video tutorial is also available. Watch the Casserole Carrier video tutorial here on the blog YouTube channel, and subscribe for more videos.
Measure the fabric:
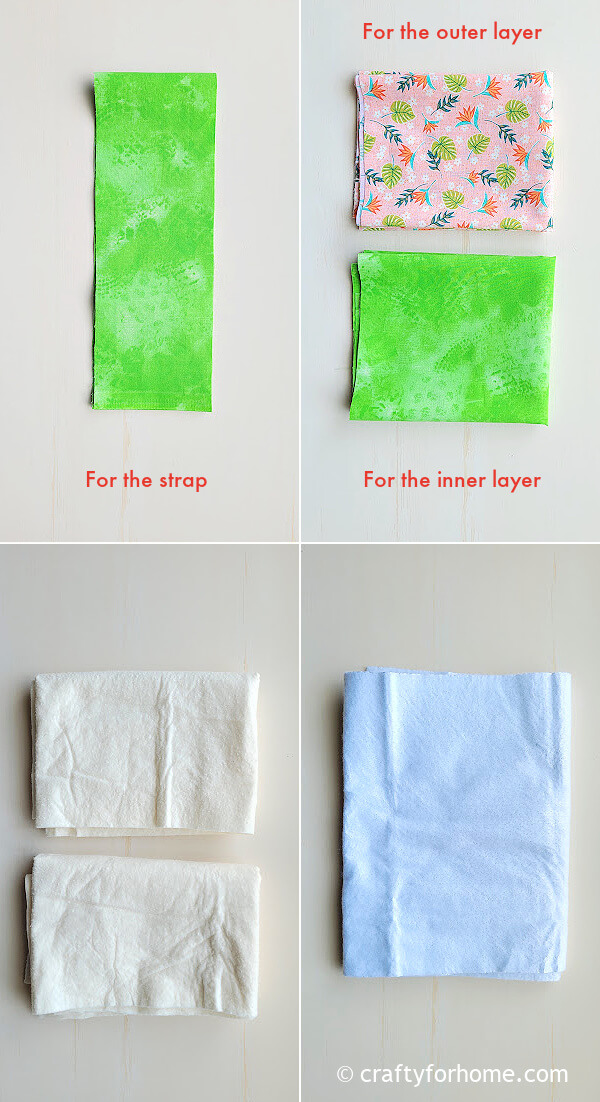
- 1 piece of 14 x 42 inches fabric for the outer layer
- 1 piece of 14 x 42 inches fabric for the inner layer
- 1 piece of 14 x 42 inches Insul- Bright
- 2 pieces of 14 x 42 inches each cotton batting
- 1 piece of 4 x 42 inches fabric for the strap
Note: Use one layer of cotton batting if it is too thick. If using a different size pan, determine the size for all materials you need by measuring the pan.
- Length + depth + length + depth + flap length you need + 1″ for seam allowance = total length for the fabric.
- Width + depth + 1″ seam allowance = total width for the fabric.
Alternatively, wrap the fabric around the pan to cover the length, width, and depth, add extra fabric length for the flap, and add 1″ seam allowance on the length and width of the fabric.
For The Strap
Fold the fabric for the strap in half lengthwise, open it, then fold both sides inward, then fold it again.
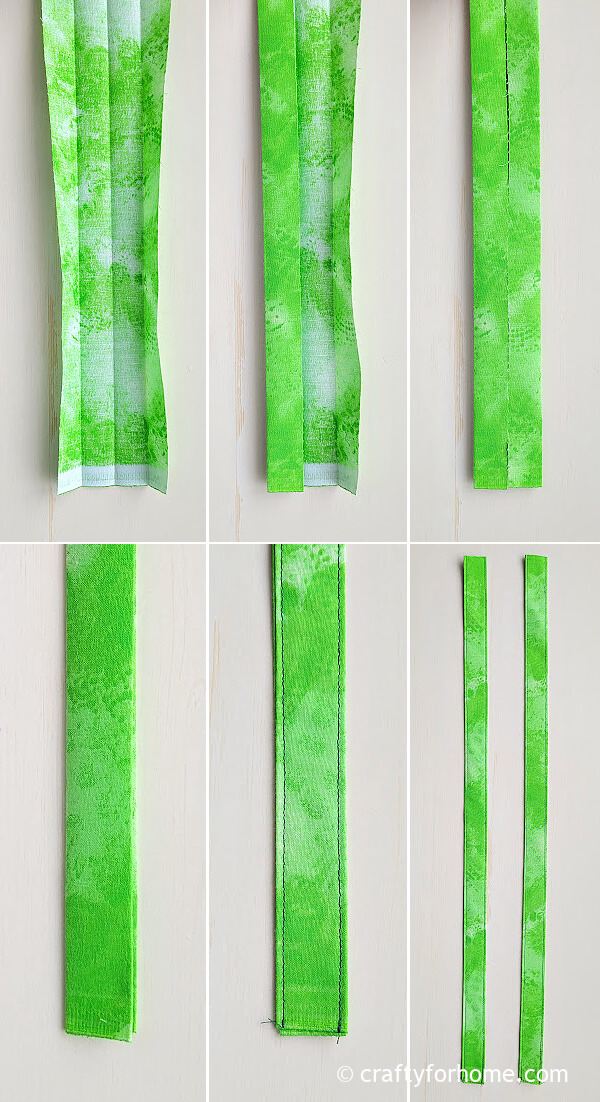
Press it with the ironing machine. Topstitch the fabric strap on both edges. Divide the fabric strap into two pieces.
For The Carrier
Pin together fabric for the outer layer with the wrong side facing up, cotton batting, Insul-Bright.
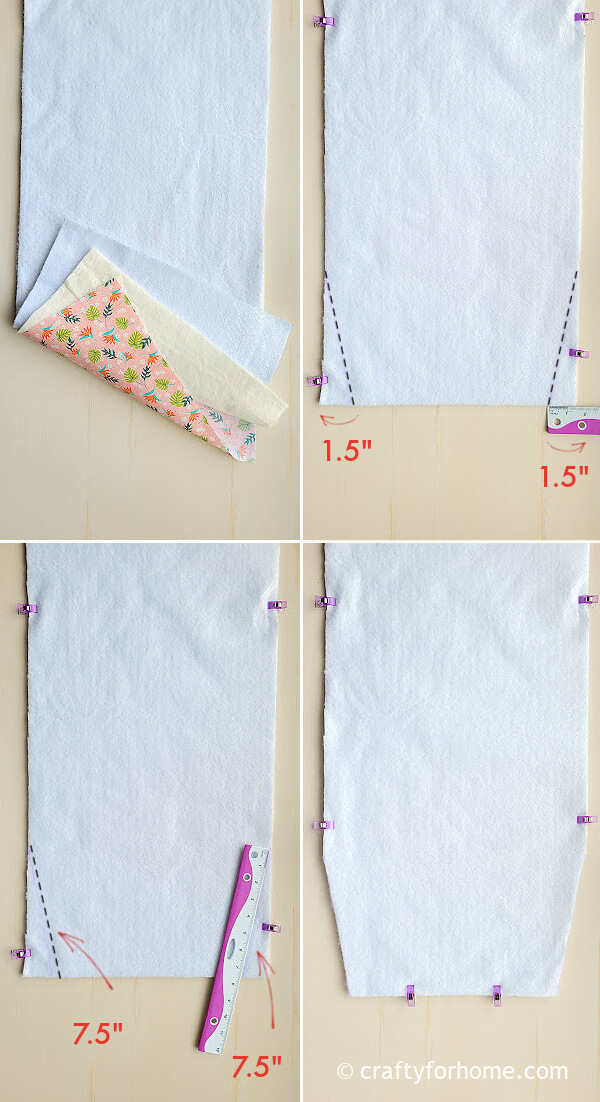
Measure and mark a spot on one of the shorter sides, 7″ from the corner to the long edge and 1.5″ from the corner to the short edge, then draw the line to connect the marked spot so that you will have two triangle shapes on both corners.
Trim the material along the marked line. This part is for the sleeve flap.
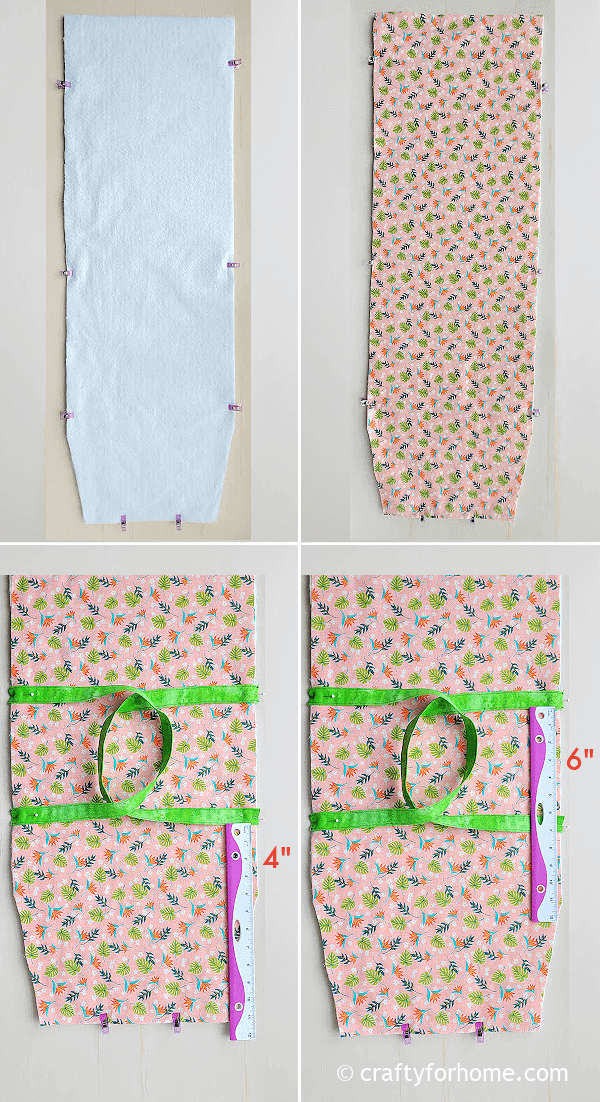
Pin the fabric straps on both long edges, 4″ from the triangle corner and 6″ between the strap ends on the right side of the fabric for the outer layer.
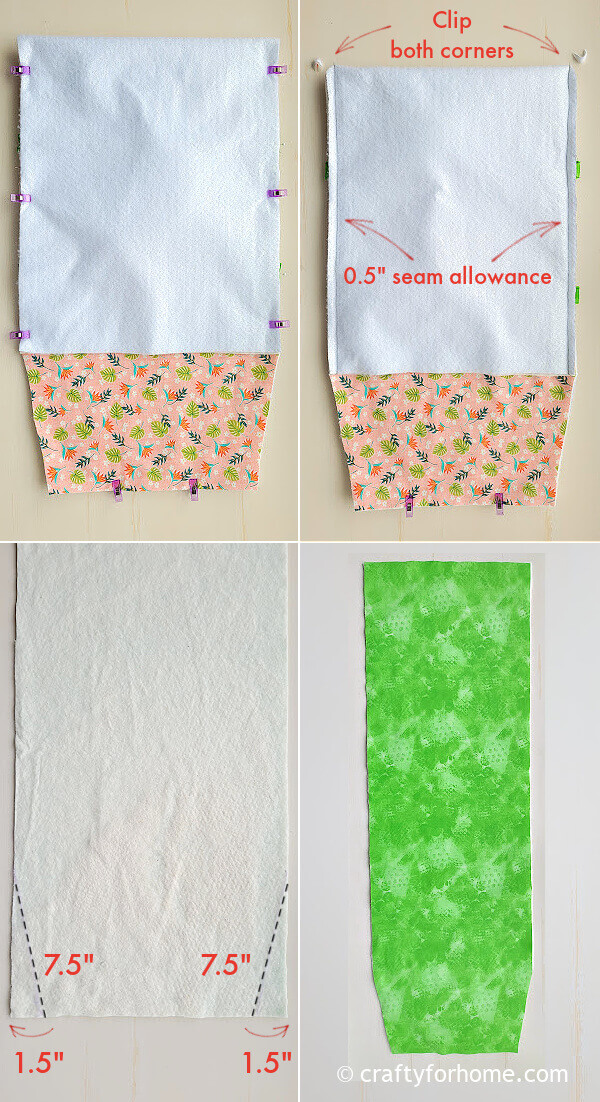
Fold the material for the outer layer in half to the triangle corner on the flap. The right side of the fabric would be facing each other.
Sew along the edge of the pouch with a 0,5″ seam allowance. Clip both corners of the pouch to reduce bulk.
Pin together fabric for the inner layer with the wrong side facing up, cotton batting.
Repeat measuring and trimming one of the shorter side materials for the inner layer’s flap.
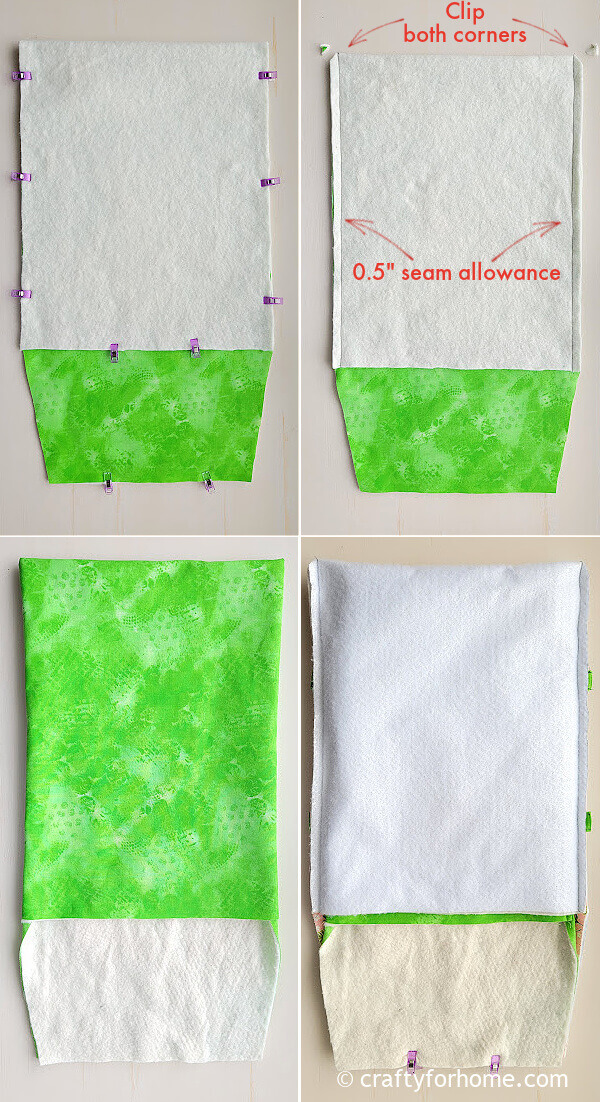
Fold the material for the inner layer in half to the triangle corner on the flap. The right side of the fabric would be facing each other.
Sew along the edge with a 0,5″ seam allowance. Clip both corners of the pouch to reduce bulk.
Turn the inner layer of the casserole carrier right side out and press it with the ironing machine.
Insert the inner layer fabric into the outer layer so that the right side fabric of both layers faces each other.
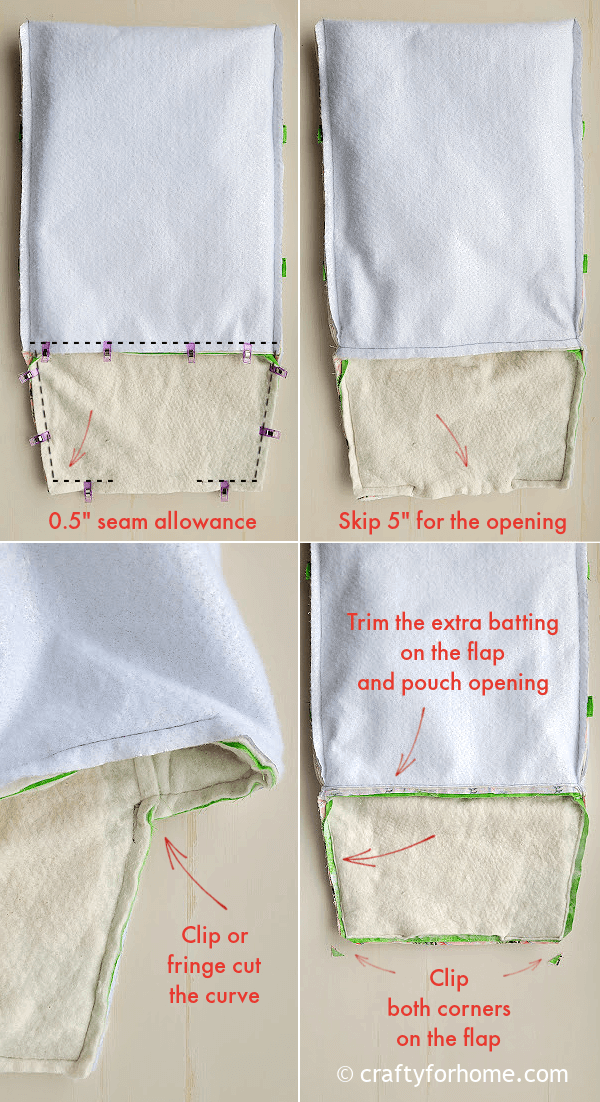
Align the edge for the flap and pouch. Pin it or use quilting clips.
Sew along the flap and the pouch with 0,5 ” seam allowance, and skip 5″ for the opening gap.
Clip or fringe cut on both curves by the pouch opening so it doesn’t look bulky and ruffled. I didn’t fringe-cut this area, so now it looks ruffled.
Trim the extra batting on the flap and the pouch opening side from the stitching line.
Clip both corners of the flap to reduce bulk.
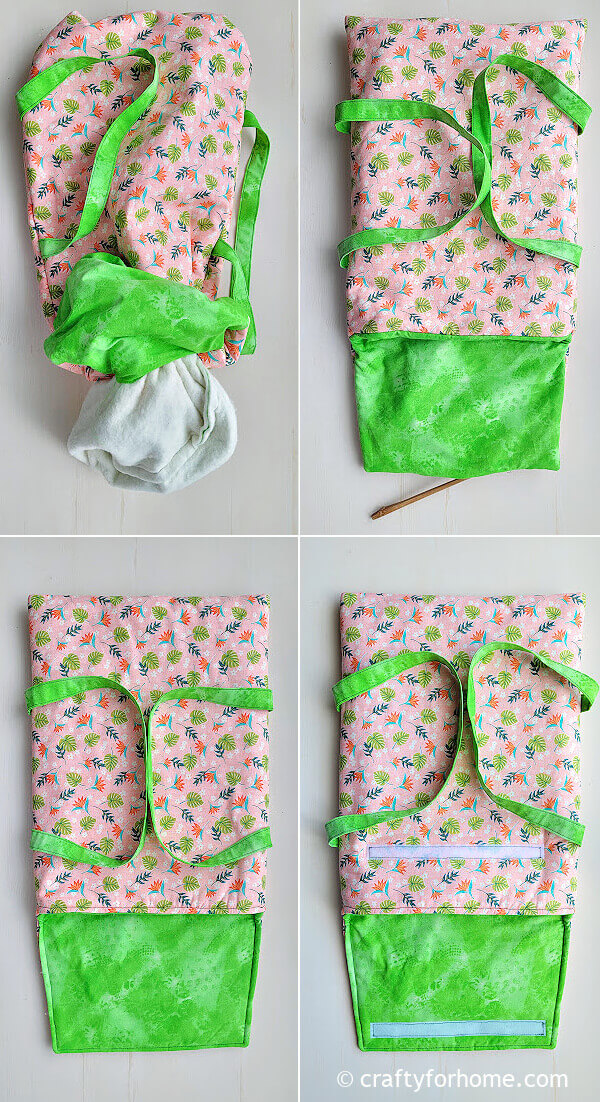
Turn the fabric right side out through the opening. Push each corner with a chopstick.
Tuck the inner sleeve in and fold the opening gap inward. Press the casserole carrier sleeve with the ironing machine.
Topstitch the pouch opening and the flap to close the opening gap at the same time.
Pin the hook and loop placement by folding the flap over the pouch, then sew the hook and loop on the flap and the pouch.
In the image above, I put the hook on the flap around 0.75″ from all edges. The loop is 2.5″ from the pouch opening edge and 2″ from both side edges.
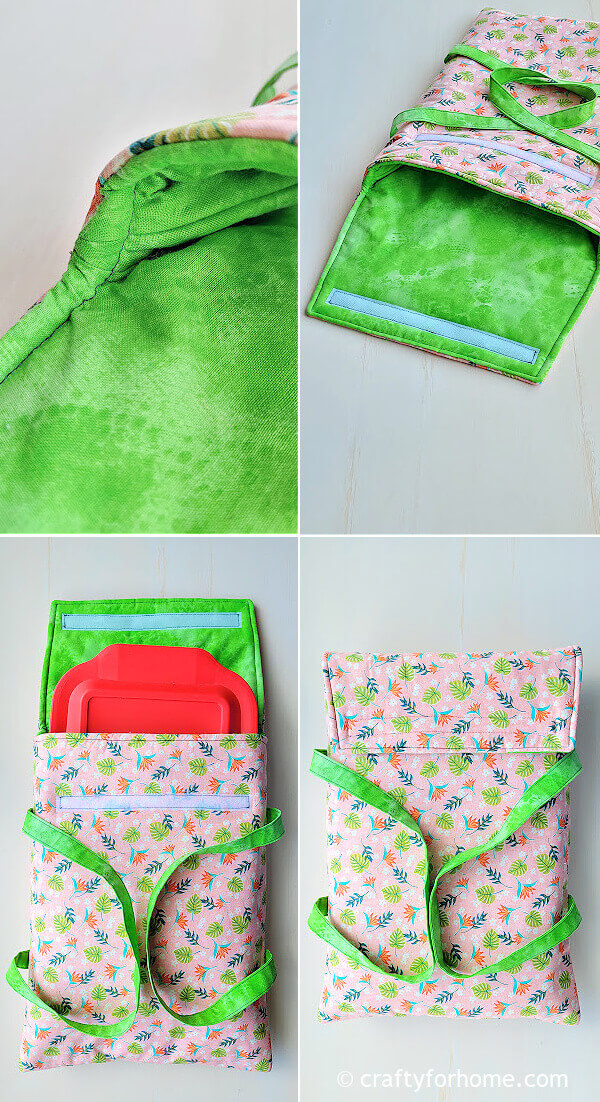
The DIY casserole carrier sleeve is ready to use now.
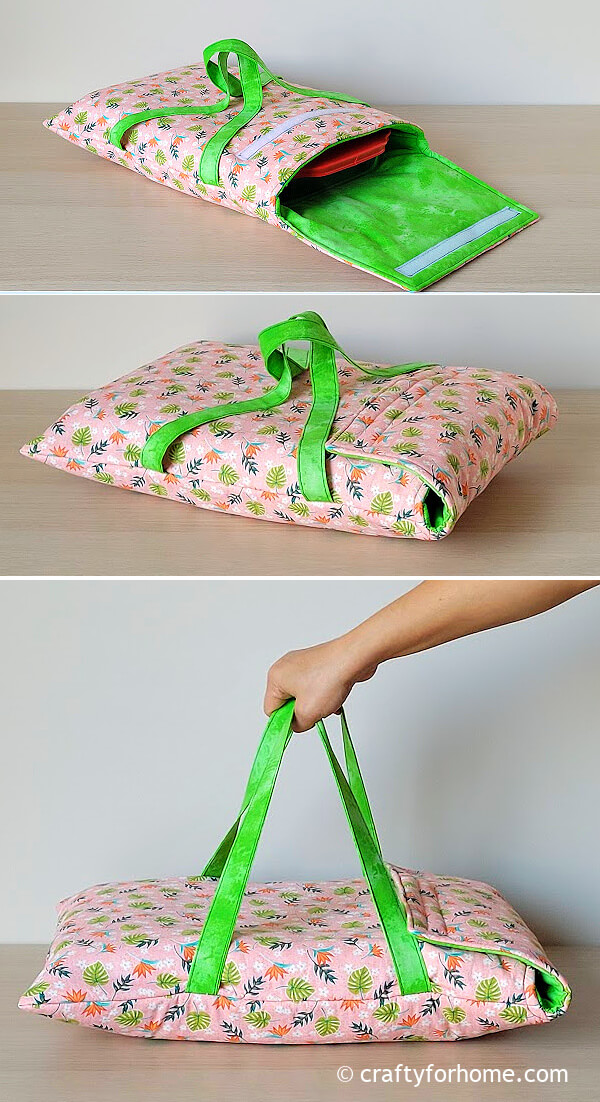
Pair the casserole dish carrier with this fabric baking dish cover if the pan has no lid. The carrier is also useful as a hot pad.
If you prefer, use this large hot pad or the reversible casserole cozy to serve the meal on the table.
Get The PDF
If it is more convenient to have the printable version of this tutorial for the project, you can purchase the Printable PDF Format of Casserole Carrier Template And Sewing Tutorial here. The e-book has the template and complete tutorials with pictures included. There are no ads or video displays on the PDF so that you can print it, and it will be available for you anytime you need the tutorial for your next project. Click on the e-book cover image above to purchase.
Bring your favourite casserole to a potluck party with this casserole carrier sleeve. #casseroledish #casserolecarrier Share on XMore Sewing Project For The Kitchen And Gift Ideas
- Reversible Pie Plate Cozy
- Self Binding Cloth Napkins
- Reversible Soup Bowl Cozy
- Microwave Dinner Plate Cozy
- Easy Binding Mug Rug
Easy DIY Casserole Carrier Sleeve With Handle
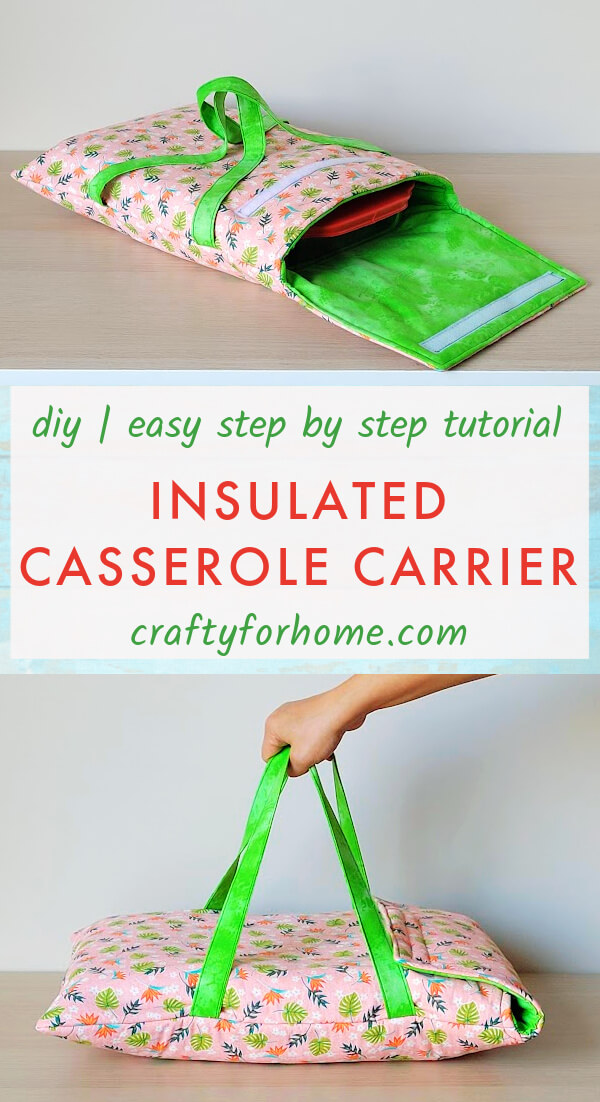
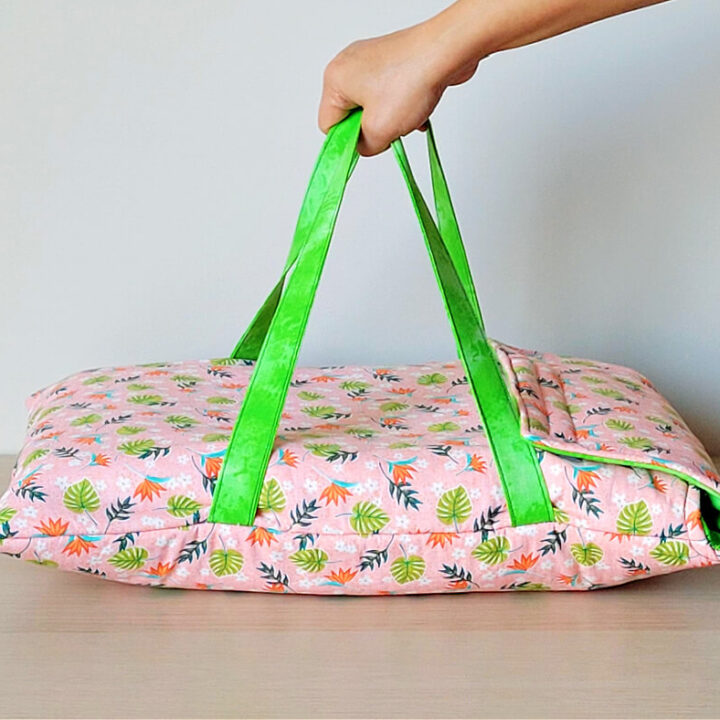
Insulated Casserole Carrier Sleeve For 9 x 13 Inches Pan
The sewing tutorial to make an insulated casserole carrier sleeve style makes it easy to transport your favourite dish to any gathering and keep the food warm. The carrier is for a 9 x 13 inches pan up to 3 inches deep.
Materials
- 1 piece of 14 x 42 inches fabric for the outer layer
- 1 piece of 14 x 42 inches fabric for the inner layer
- 1 piece of 14 x 42 inches Insul- Bright
- 2 pieces of 14 x 42 inches each cotton batting
- 1 piece of 4 x 42 inches fabric for the strap
- 9" sew-on hook and loop, like the Velcro brand
Tools
- Disappeared ink fabric marker.
- Pin or quilting clips
- Thread
- Chopstick
- Ruler
- Scissors
- Ironing machine
- Sewing machine
Instructions
- Fold the fabric for the strap in half lengthwise, open it, then fold both sides inward, then fold it again.
- Press it with the ironing machine. Topstitch the fabric strap on both edges.
Divide the fabric strap into two pieces. - Pin together fabric for the outer layer with the wrong side facing up, cotton batting, Insul-Bright.
- Measure and mark a spot on one of the shorter sides, 7" from the corner to the long edge and 1.5" from the corner to the short edge, then draw the line to connect the marked spot so that you will have two triangle shapes on both corners.
- Trim the material along the marked line. This part is for the sleeve flap.
- Pin the fabric straps on both long edges, 4" from the triangle corner and 6" between the strap ends on the right side of the fabric for the outer layer.
- Fold the material for the outer layer in half to the triangle corner on the flap. The right side of the fabric would be facing each other.
- Sew along the edge of the pouch with a 0,5" seam allowance. Clip both corners of the pouch to reduce bulk.
- Pin together fabric for the inner layer with the wrong side facing up, cotton batting. Repeat measuring and trimming one of the shorter side materials for the inner layer's flap.
- Fold the material for the inner layer in half to the triangle corner on the flap. The right side of the fabric would be facing each other.
- Sew along the edge with a 0,5" seam allowance. Clip both corners of the pouch to reduce bulk.
- Turn the inner layer of the casserole carrier right side out and press it with the ironing machine.
- Insert the inner layer fabric into the outer layer so that the right side fabric of both layers faces each other.
- Align the edge for the flap and pouch. Pin it or use quilting clips.
- Sew along the flap and the pouch with 0,5 " seam allowance, and skip 5" for the opening gap.
- Clip or fringe cut on both curves by the pouch opening so it doesn't look bulky and ruffled.
- Trim the extra batting on the flap and the pouch opening side from the stitching line. Clip both corners of the flap to reduce bulk.
- Turn the fabric right side out through the opening. Push each corner with a chopstick.
- Tuck the inner sleeve in and fold the opening gap inward. Press the casserole carrier sleeve with the ironing machine.
- Topstitch the pouch opening and the flap to close the opening gap at the same time.
- Pin the hook and loop placement by folding the flap over the pouch, then sew the hook and loop on the flap and the pouch. For this casserole carrier, put the hook on the flap around 0.75" from all edges. The loop is 2.5" from the pouch opening edge and 2" from both side edges.
- The DIY casserole carrier sleeve is ready to use now.
Notes
If using a different size pan, determine the size for all materials you need by measuring the pan.
- Length + depth + length + depth + flap length you need + 1" for seam allowance = total length for the fabric.
- Width + depth + 1" seam allowance = total width for the fabric.
Alternatively, wrap the fabric around the pan to cover the length, width, and depth, add extra fabric length for the flap, and add 1" seam allowance on the length and width of the fabric.
Anything with insulation or Insul-Bright is not for microwave use.
Use one layer of cotton batting if it is too thick.
Leave a Reply