Use this step-by-step sewing instruction to make a cat coin pouch keychain with a zipper. This cute cat coin purse has a zipper closure to keep coins, small accessories, and other small items safe and within reach when needed.
Easy DIY Cat Coin Pouch Keychain
This little zipper pouch is a great gift idea. Whether you’re a cat person or not, this kitty cat coin purse is still a great idea to make for daily use or give as a customized gift.
As an Amazon Associate I earn from qualifying purchases. This post may contain affiliate links. Please see the Disclosure Policy for details.

The zipper coin bag has a keychain hardware attachment. It’s great for keeping small items you constantly need within reach.
If this DIY coin bag looks too large, it is easily customizable to make a smaller size instead. You only need to adjust the measurement for the square and circular fabrics.
If you only need storage for a few quarter coins for a shopping cart, you can make this easy quarter-keeper keychain and attach it to the keyfob holder. It is much easier to find when I need the coin for the grocery shopping cart.
Supply To Make Cat Coin Bag
Use one piece of fat-quarter fabric to make one pouch with the same print and color for the lining and outer layers. If layer-cake-size fabrics are available, you can use four pieces to make one pouch with different prints and colors for the lining and outer layers. Use the leftover fabric for a DIY bag strap using this tutorial. You can also use fabric scraps to mix and match the color and prints for this cute coin pouch.
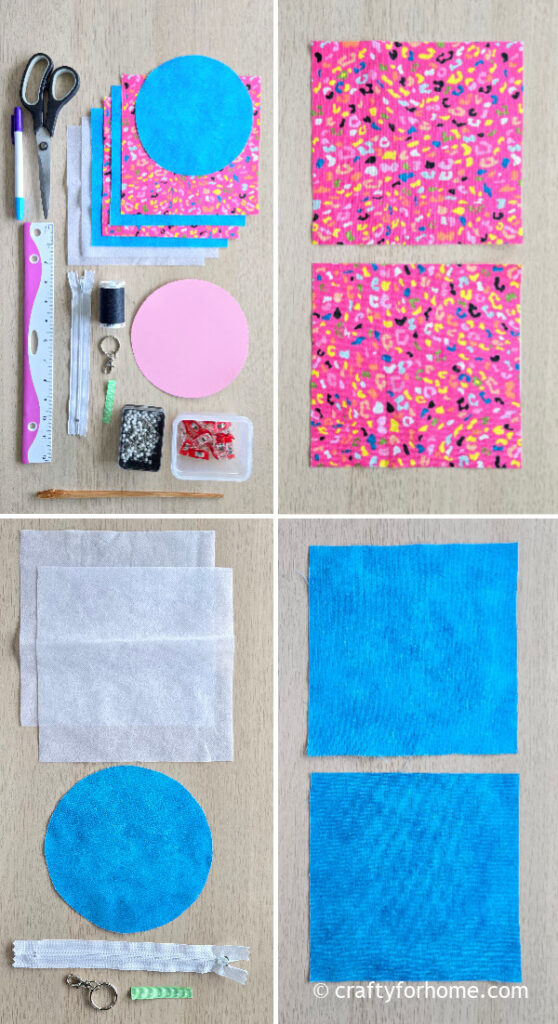
The cat coin pouch pattern is as simple as a square shape and circle. Use a small plate or a pen compass to make the circle template.
- 2 pcs of 7″ square fabric for the lining layer
- 2 pcs of 7″ square fabric for the outer layer
- 2 pcs of 7″ fusible interfacing for the outer layer
- 1 piece of 6″ diameter circle fabric for the cat ear
- 1 piece of 7″ zipper
- 1 piece of 2″ ribbon
- 1 set of a keyring with a swivel clasp
- 6″ circle paper template, or use a small 6″ plate or pen compass
- Disappeared ink marker, I use the dual-purpose fabric marker
- Zipper foot
- Pins or quilting clips
- Ruler
- Scissors
- Thread
- Chopstick
- Pinking Shears (optional)
- Sewing machine
- Clothes iron, I use a similar one to this mini steam iron
Zipper Cat Coin Pouch Tutorial
The video tutorial is also available. Click on this link to watch the Cat Coin Pouch Keychain Video Tutorial on my YouTube channel, and subscribe for more videos.

Fuse the interfacing to the wrong side of both outer layer fabrics with a clothes iron.
To prepare the fabric pieces for the back panel, measure one of the outer and one of the lining fabrics 2.5″ from one edge. Draw a line, then cut the fabric along the line. You will have 1 piece of 2.5″ x 7″, 1 piece of 4.5″ x 7″ and 1 piece of 7″ x 7″ for both lining and outer layer.

To sew the back panel with the zipper, with the right side of the smaller fabric for the outer layer side up and the zipper front side down, pin the zipper on the longer edge and sew straight along the edge.
Pin the smaller fabric for the lining right side down to the zipper and align the edge, then sew it with the first stitched fabric.

Flip both fabrics so that the wrong sides face each other. Topstitch along the hem.

Repeat the process of sewing the other fabric pieces for the back panel.
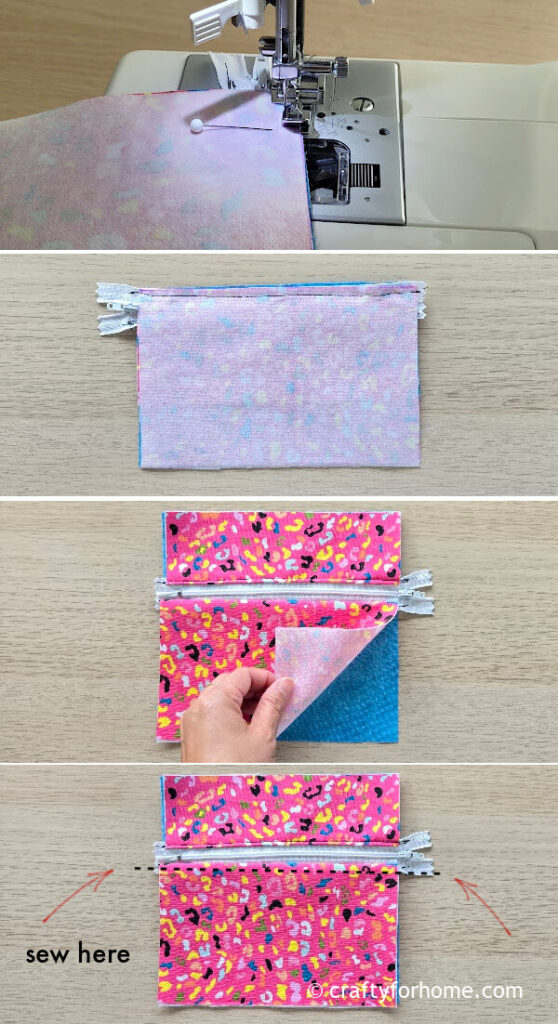
Pin the right side of the lining facing down, the right side of the outer layer facing up, and the right side of the outer layer from the back panel facing down.

Trace the 6″ diameter circle template on the fabric. Put the zipper pull inside the circle line, then trim the fabric along the traced line.

To make the cat ear pieces, fold the 6″ diameter fabric circle in half and cut it into two half-circle each.
With the right side of the fabric facing up, fold the fabric in half. Sew along the raw straight edge.

Clip the pointy 90° corner. Flip the fabric right side out, push the corner with a chopstick, position the seam in the center, and press both fabric pieces with a clothes iron. Trim the extra fabric along the curved edge.
With the center seam facing up, fold both edges of the fabric ear inward to look like a single pleated fold on each side.
With the center seam facing down, pin the fabric ear into the front panel fabric with both raw edges aligned. Sew along the edge of both fabric ears.

Loop the ribbon and pin it to the front panel. You can pin the ribbon under one ear or in between both ears.
Pin both front and back panel fabric layers, with the right side of both outer fabrics facing each other.
Sew along the edge of the circle fabric with a 0.5″ seam allowance. Clip along the edge. Another option is to sew zigzag stitching, use pinking shears, or a serger machine.

Turn the pouch on the right side out through the zipper. Use a chopstick to push the circle edge. Press the cat pouch with a clothes iron. Topstitch along the circle edge. Attach the keyring to the ribbon loop.

The zipper cat coin pouch is ready to use now.
The Size Of The Cat Coin Purse Keychain
This cute zipper pouch is around 5″ in diameter. The zippered pocket is large enough to store multiple coins, cards, cash, or sweet treats.

Attach the keychain clasp to the backpack, daily errand purse, or laptop bag to keep cash, earbuds, USB stick, charger cord, chapstick, or any small items you constantly need within reach.

You can also attach this cute zipper pouch to the pet leash to store small bags, treats, or cash, so you always have them ready for the daily walk with furry friends.
Use Fabric Scraps To Make This Cute Cat Coin Bag With Zipper. #coinpouch #DIYbag Share on XMore DIY Pouch Sewing Projects
- Chapstick Holder Keychain
- Hand Sanitizer Holder Keychain
- Cell Phone Wristlet Bag
- DIY Sunglasses Pouch
- Earbud Pouch Keychain Tutorial
- Easter Egg Treat Pouch
Make This Easy DIY Cat Zipper Coin Bag With Keychain Attachment


Leave a Reply